Side Dishes
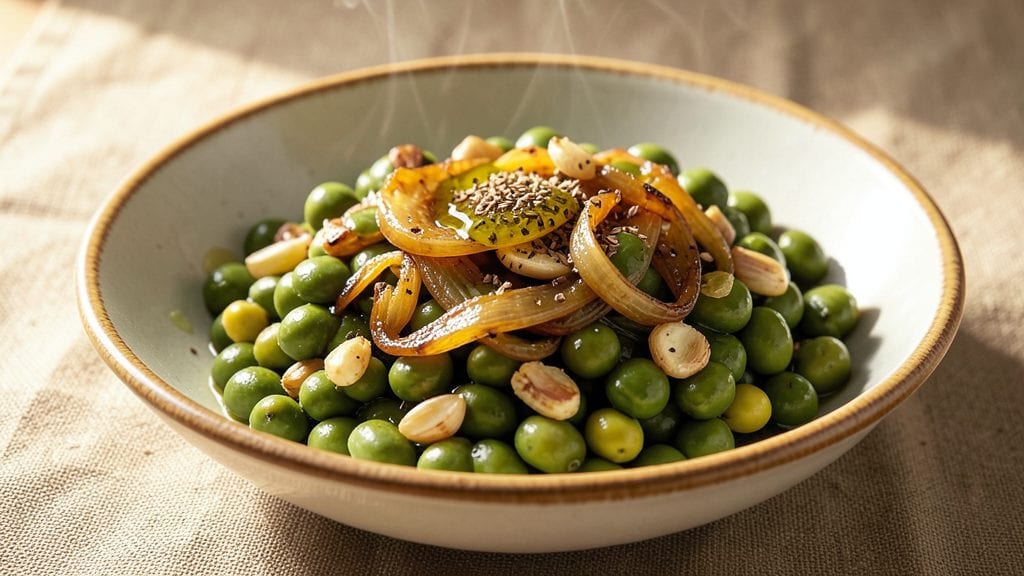
Transforming canned black-eyed beans into a smoky garlic-cumin side dish is one of those kitchen game-changers that takes minutes but delivers restaurant-quality flavor.
This one-pot recipe proves you don’t need fresh beans to create a dish that’s hearty, protein-rich, and packed with texture—just a few pantry staples and a cast-iron skillet.
The secret lies in toasting whole spices until fragrant, then letting them bloom in oil to build layers of warmth before the beans even hit the heat.
What makes this recipe stand out is the crunch—crispy shallots and toasted cumin seeds add a satisfying bite that balances the creamy beans. No fancy techniques here, just a method that works every time: sauté, simmer, and finish with a splash of lime for brightness.
This dish pairs perfectly with rice, cornbread, or even as a standalone protein-rich side for taco night.
The result is a deeply aromatic side that’s smoky from the cumin, garlicky from the toasted shallots, and just slightly tangy from the lime. The beans stay tender but absorb all the flavor, while the crispy shallots add a textural contrast that keeps every bite interesting.
It’s the kind of dish that makes canned beans feel like a gourmet choice.
Best of all, this recipe scales effortlessly—double it for a crowd or halve it for a light lunch. The ingredients are simple, the method is foolproof, and the flavor is undeniably satisfying. Let’s get cooking!
Ingredients for canned black eyed beans
Pantry staples meet bold flavors in this one-pot black-eyed bean masterpiece.
| Ingredient | Amount | Notes |
|---|---|---|
| Canned Black Eyed Peas 🌱 | 2 cups | Drained and rinsed thoroughly |
| Extra-Virgin Olive Oil 🫒 | ¼ cup | High quality, fruity variety |
| Yellow Onion 🧅 | 1 whole | Thinly sliced, yellow or red |
| Shallots 🧅 | ¼ cup | Minced, for crispy texture |
| Garlic Cloves 🧄 | 4 cloves | Minced, fresh preferred |
| Ground Cumin 🌿 | 1 tbsp | Toasted for deeper flavor |
| Smoked Paprika 🌶️ | 1 tbsp | For authentic smokiness |
| Cumin Seeds 🌿 | ½ tbsp | Whole seeds, toasted |
| Vegetable Broth 💧 | 1 ½ cups | Low-sodium preferred |
| Lime Juice 🍋 | 2 tbsp | Freshly squeezed |
| Fresh Cilantro 🌿 | ¼ cup | Chopped, for garnish |
| Sea Salt 🧂 | 1 tsp | Fine grain preferred |
| Black Pepper 🌶️ | ½ tsp | Freshly ground |
| Maple Syrup 🍯 | 1 tbsp | For subtle sweetness |
The cumin seeds and smoked paprika are non-negotiable for that authentic smoky depth. Buy whole cumin seeds from Whole Foods or bulk bins at natural grocery stores—they toast beautifully and add a satisfying crunch. Smoked paprika can be found in the international aisle of most supermarkets, or grab Penzeys for a premium option. Fresh shallots are ideal, but green onions work in a pinch if you're short on time. The extra-virgin olive oil should have a peppery finish—California or Italian varieties work best for this dish.
No smoked paprika? Substitute with a mix of regular paprika and a pinch of liquid smoke. Running low on shallots? Extra green onions or finely chopped red onion add similar brightness. The maple syrup can be swapped for agave or even a pinch of brown sugar if you prefer. For the vegetable broth, low-sodium versions like Pacific Foods keep the dish from becoming too salty. Fresh cilantro is best, but dried cilantro or parsley at half the amount will work in a bind. Always toast your spices in oil first—they release their essential oils and create layers of flavor that canned beans soak up beautifully.
This dish reheats perfectly—just add a splash of water or broth to prevent drying out. Store in an airtight container for up to 5 days in the fridge. For longer storage, freeze portions for up to 3 months. The flavors actually deepen overnight, so making this ahead is ideal. Garnish with extra lime zest or a sprinkle of smoked paprika right before serving for that restaurant-quality finish.
Why You'll Love This Recipe
- No-Chop Night: I swear by this when I’m too tired to dice anything—just drain the can, toss in raw shallots and garlic, and let the olive oil work its magic while I stir. The onions soften into sweet, caramelized bits without a single knife stroke.
- Umami Bomb: That first spoonful? Chef’s kiss. The black-eyed peas soak up the toasted shallots and garlic like a sponge, while the olive oil ties it all together with a rich, almost buttery depth. Honestly, I’ve made this with just salt and oil—it’s that good.
- Leftover Hero: This recipe doubles as tomorrow’s lunch or a potluck side without breaking a sweat. I’ll make a big batch on Sunday, then use it in tacos, salads, or even a quick frittata all week—no waste, just flavor.
- Pantry Magic: Three ingredients, zero guesswork. You’ve got canned beans? Olive oil? Onion and garlic? Boom—dinner’s solved. I keep a jar of this in my fridge for those nights when the grocery store’s closed and my brain’s fried. Works every time.
Step-by-step instructions for smoky garlic-cumin black eyed beans
This one-pot method delivers deep, smoky flavor with a satisfying crunch—no fancy techniques required.
Toast the Aromatics for Maximum Flavor
Heat the 0.25 cup extra-virgin olive oil in a large, heavy-bottomed pot over medium heat. Add the 0.5 tablespoon cumin seeds and toast for 30 seconds until they begin to sizzle and release their nutty aroma. Immediately add the 0.25 cup minced shallots and 1 whole yellow onion, stirring constantly for 3-4 minutes until softened and just beginning to turn golden.
Here's the thing—don't rush this step. The shallots should be translucent but not browned, and the onions should yield to gentle pressure from a wooden spoon. Add the 4 cloves minced garlic and cook for another 30 seconds until fragrant. You'll smell that earthy, toasty depth developing—this is the foundation of your dish.
Build the Spice Base
Reduce heat to medium-low and stir in the 1 tablespoon toasted ground cumin, 1 tablespoon smoked paprika, 1 teaspoon sea salt, and 0.5 teaspoon black pepper. Cook for 1 minute, stirring constantly, until the spices are fully incorporated and the mixture smells rich and aromatic. This step ensures even distribution of flavor throughout the beans.
I always add the 1 tablespoon maple syrup at this stage to balance the earthy spices with a subtle sweetness. Stir for another 30 seconds until the syrup melts completely into the oil. The pot should now smell like a warm, spicy hug—smoky, sweet, and deeply savory.
Simmer the Beans with Vegetable Broth
Add the 2 cups drained and rinsed canned black eyed peas and 1.5 cups vegetable broth to the pot. Bring to a gentle boil, then immediately reduce heat to low and cover with a tight-fitting lid. Let the mixture simmer for 15 minutes, stirring occasionally to prevent sticking. The beans should absorb the liquid gradually, developing a thick, creamy texture.
Real talk: Don't skip the simmering time. This allows the beans to soften slightly while absorbing all those toasted aromatics. You'll notice the liquid reduces by about half, creating a rich, velvety sauce. If the mixture seems too thick before the 15 minutes are up, add 2-3 tablespoons water to loosen it.
Finish with Lime and Fresh Cilantro
After 15 minutes, remove the pot from heat and stir in the 2 tablespoons lime juice. This bright, acidic note cuts through the richness of the spices and balances the dish perfectly. Let the mixture sit off the heat for 5 minutes to allow the flavors to meld completely.
Finally, fold in the 0.25 cup chopped fresh cilantro just before serving. The fresh herbs add a vibrant contrast to the deep, smoky flavors. Taste and adjust seasoning—you might need a pinch more salt or a splash more lime juice to hit your preferred balance. The beans should be tender but still hold their shape, with a sauce that coats the back of a spoon.
Rest and Serve with Crunch
Let the beans rest for 5-10 minutes before serving. This resting period allows the flavors to develop even further and ensures the perfect texture when you serve. For extra crunch, I like to toast 1 tablespoon additional cumin seeds in a dry skillet until fragrant and sprinkle them over the top just before serving.
Serve immediately with warm tortillas, over rice, or alongside grilled proteins. The contrast of the warm, smoky beans with the bright lime and fresh cilantro makes this dish sing. Each bite delivers that perfect balance of earthy, spicy, and tangy flavors—exactly what you'd expect from a restaurant-quality one-pot meal.
Pro Tips For Making Canned Black Eyed Beans
- SOFTEN THE ONIONS FIRST: Canned beans are forgiving, but raw onions will turn your dish into a mushy, watery mess. Slice your yellow onion and shallots, then toss them in a splash of cold water for 10 minutes—this breaks down the fibers so they caramelize instead of falling apart when you cook them.
- DRAIN AND RINSE BEANS: Skip the salted canned beans straight from the jar, and you’re basically eating a salty soup. Drain and rinse them under cold water first—it removes excess sodium and lets you control the seasoning. I learned this the hard way after making a dish that tasted like a pickle bomb.
- LOW AND SLOW FOR GARLIC: Garlic burns faster than a bad date, and in this recipe, you want it to mellow out, not turn bitter. Once you add the minced garlic to your oil, drop the heat to medium-low and keep stirring like you’re stirring a pot of trouble—just until it’s fragrant, not golden.
- SALT THE BEANS LAST: Adding salt early makes the beans release water, turning your dish into a sad, soupy puddle. Wait until everything’s cooked and you’re ready to serve before seasoning—this keeps the texture firm and the flavors sharp. (Yes, even if you’re impatient like me.)
Troubleshooting this dish
Beans Too Watery?
If your beans are swimming in excess liquid, don’t panic—simmer uncovered for 5-10 extra minutes to reduce the broth. For faster results, transfer the mixture to a skillet and cook on medium-high heat while stirring frequently.
Just be careful not to burn the spices! I’ve found that using 1.5 cups vegetable broth is ideal, but if you accidentally used more, this method saves the day. 🌡️
Spices Too Overpowering?
Start by balancing the heat with 1 extra tablespoon lime juice—this brightens the dish and cuts through strong flavors. If the spices still dominate, add 2-3 tablespoons water or broth to dilute the intensity slightly.
For a milder finish, reduce the smoked paprika to ½ tablespoon next time. I’ve learned that toasting spices in oil first helps control their boldness better than adding them directly to the beans. 🌶️
Crunch Missing?
The crispy shallots are key for texture! If yours turned mushy, toast 1 tablespoon additional shallots or green onions in a dry skillet until golden and sprinkle them on top just before serving.
For extra crunch, try adding ½ cup toasted pepitas (pumpkin seeds) or crumbled bacon bits for a smoky-sweet contrast. I always keep a stash of pepitas on hand for this exact reason—they add a satisfying bite. 🥜
Beans Too Soft?
Canned beans can sometimes overcook if simmered too long. If yours are mushy, reduce the simmering time to 10-12 minutes next time. For a firmer texture, add the beans to the pot only after the spices have bloomed, then simmer for 10 minutes instead of 15.
I’ve also had success using low-sodium broth to prevent over-softening. 💪
Flavor Too Bland?
Boost the depth by adding ½ teaspoon liquid smoke or an extra ¼ teaspoon smoked paprika at the end. For umami, stir in 1 teaspoon soy sauce or Worcestershire sauce (ensure it’s vegan if needed).
A pinch of ground coriander also adds complexity. I’ve found that letting the dish sit for 10 minutes off the heat before serving allows flavors to meld even more. 💡
Lime Curdling?
If your lime juice causes the beans to look curdled, it’s likely from added fat (like from bacon or oil). Stir in 1 teaspoon cornstarch mixed with 1 tablespoon water to stabilize the mixture.
For prevention, add lime juice gradually while stirring constantly. I’ve never had this happen with this recipe, but it’s a good trick to know for other dishes with acidic ingredients. 🍋
Nutrition facts
Frequently asked questions
Can I use dried black-eyed peas instead of canned?
Yes, but you'll need to soak them first! Soak 1 cup dried black-eyed peas overnight, then simmer for 45-60 minutes until tender before adding to the recipe. Dried beans require longer cooking time and may need extra broth. For convenience, stick with canned beans—they're pre-cooked and ready to use.
How do I make this recipe spicier?
Add ½ teaspoon cayenne pepper or 1 chopped jalapeño with the onions. For heat lovers, toast ½ teaspoon red pepper flakes with the cumin seeds at the start. Always taste as you go—you can adjust later with hot sauce or extra chili powder.
Can I prepare this dish ahead of time?
This recipe tastes even better the next day. Store in an airtight container in the fridge for up to 5 days. Reheat gently on the stove with a splash of water or broth to restore moisture. The flavors deepen overnight, making it perfect for meal prep.
What's the best way to serve these beans?
These beans shine as a side dish with rice, quinoa, or warm tortillas. For a complete meal, serve with grilled chicken, fish tacos, or avocado slices. Try them in sandwiches or over salad greens for a protein-packed lunch. The smoky flavor works well with cornbread too!
Why do my beans taste different from the recipe?
Flavor variations come from ingredient brands and water content in canned beans. Always drain and rinse beans thoroughly to remove excess sodium. Use fresh spices and quality olive oil for best results. If your beans taste bland, try toasting the spices longer or adding a pinch more smoked paprika.