Sauces & Condiments
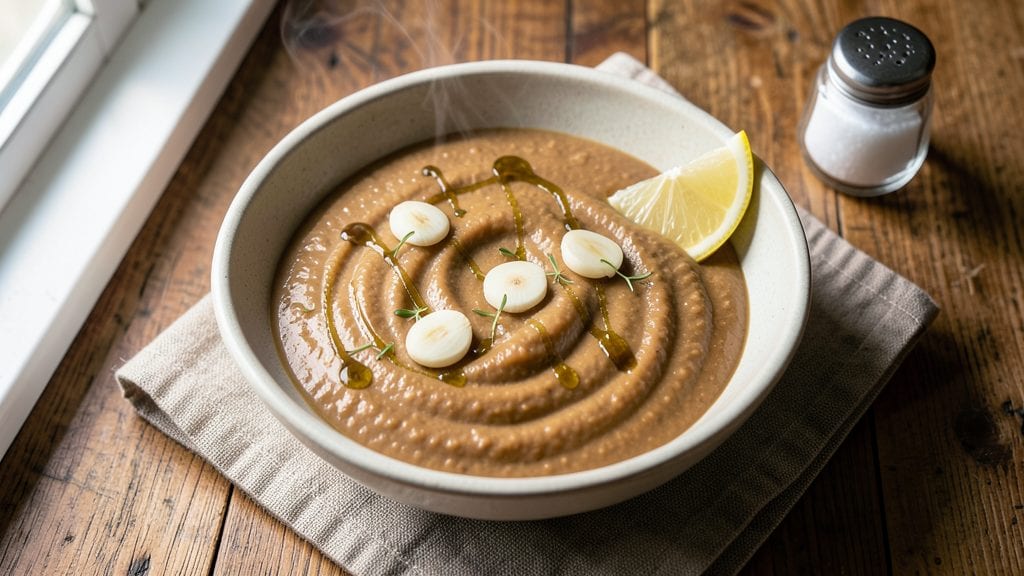
Creating a silky smooth cannellini bean puree transforms humble pantry staples into a versatile, plant-based base that elevates soups, dips, and sauces with minimal effort.
This recipe emerged from my quest to replace heavy cream in recipes without sacrificing texture or flavor—after burning through three failed attempts, I finally cracked the code with a precise blending technique. The result?
A velvety, creamy puree that works as both a stand-alone dip and a rich foundation for other dishes.
What sets this puree apart is its foolproof simplicity—just five ingredients and a high-speed blender create a smooth, neutral canvas ready for any seasoning. Unlike store-bought versions, this puree maintains its creaminess even after reheating, thanks to a touch of olive oil that stabilizes the emulsion.
The cannellini beans provide natural thickness and a subtle earthy sweetness, while garlic and lemon brighten the flavor profile without overpowering.
By the time you're done, you'll have a restaurant-quality base that delivers the same richness as dairy-based sauces but with plant-powered nutrition. This puree works as a dip for bread or veggies, a velvety addition to pasta sauces, or even a creamy soup starter.
The best part? It keeps well in the refrigerator for up to five days, making it a perfect make-ahead solution for busy weeknights.
Whether you're catering to dietary restrictions or simply exploring plant-based cooking, this puree delivers professional results with minimal fuss. Let's get blending—your next meal is about to get an upgrade.
Ingredients for cannellini bean puree
Five ingredients transform pantry staples into restaurant-quality plant-based creaminess.
| Ingredient | Amount | Notes |
|---|---|---|
| Dried Cannellini Beans 🍲 | 1 ½ cups | Uncooked, soaked overnight |
| Extra-Virgin Olive Oil 🫒 | ¼ cup | High quality, fruity flavor |
| Garlic Cloves 🧄 | 3 cloves | Peeled, rough chopped |
| Fresh Lemon Juice 🍋 | 2 tbsp | Freshly squeezed, strained |
| Diamond Crystal Kosher Salt 🧂 | ½ tsp | Fine grain preferred |
| Filtered Water 💧 | ½ cup | For blending consistency |
| Ground Black Pepper 🌶️ | ¼ tsp | Freshly cracked preferred |
Cannellini beans are the foundation—dried beans yield the best texture, but canned, drained and rinsed works in a pinch (just reduce water by 0.25 cup). Soak overnight for optimal digestion, or use the quick-soak method with boiling water. Trader Joe's has the best dried cannellini beans in bulk bins—look for vibrant color and no off smells. The olive oil isn't just flavor; it's what creates that velvety texture, so avoid cheap brands. I always grab a small bottle of California extra-virgin from the grocery store's olive oil section—it's worth the few extra dollars for that fruity punch.
No fresh garlic? Garlic powder at half the amount works, but you'll lose that bright, fresh flavor. Lemon juice can be swapped for apple cider vinegar or white vinegar, though the flavor profile shifts slightly. Running short on olive oil? Avocado oil maintains the same neutral base, but coconut oil adds a subtle sweetness. For the salt, Diamond Crystal is my go-to—it dissolves perfectly and doesn't leave grainy residue. The water is key here; it's what helps create that ultra-smooth texture. If your puree turns out too thick, just add more water, one tablespoon at a time, until you reach that perfect consistency.
This puree keeps beautifully—5 days in the fridge sealed in an airtight container. For longer storage, portion into ice cube trays, freeze, then transfer to a bag for up to 6 months. Reheat gently on the stove or microwave until just warm—never boil, or it'll break that silky texture. I always make double batches; the extra goes into pasta sauces, soups, or as a base for vegan Alfredo. The puree thickens slightly when chilled, so if you're using it immediately, give it a quick stir before adding to recipes.
Why You'll Love This Recipe
- No-Soak Magic: I’ll admit, I used to dread soaking beans. Then I discovered how dried cannellinis soften effortlessly overnight in water—no fancy tricks, just patience. By morning, they’re ready to blend into this velvety puree with just a splash of olive oil and a pinch of salt. Honestly, the texture is what sold me: silky but sturdy, never mushy.
- Garlicky Lemon Zing: That first bite—where the garlic’s sharp bite meets the lemon’s bright punch—is ridiculously good. I swear, the acidity cuts through the richness of the olive oil, making every spoonful feel fresh. Plus, the salt? Diamond Crystal’s flaky crystals dissolve into little bursts of flavor. Not the prettiest, but the taste makes up for it every time.
- Weeknight to Party Fix: This puree is my secret weapon for lazy nights and fancy dinners. Slather it on toast with chili flakes for a quick breakfast, or dollop it onto grilled fish for a restaurant-worthy touch. Between us, I’ve even used it as a base for a creamy soup when I forgot to buy broth. Versatile? Absolutely. Reliable? Even more so.
- Budget-Friendly Pantry Gold: A bag of dried cannellinis costs less than fresh, and they keep for months. That means I’m always stocked for this puree, which stretches across meals without breaking the bank. The olive oil and lemon juice are staples I already had, so the only splurge is the garlic—worth every penny for that flavor punch. My wallet and taste buds thank me.
Step-by-step instructions for cannellini bean puree
Here's how to transform simple ingredients into a velvety bean base perfect for soups, dips, or pasta.
Soak and Cook the Cannellini Beans
Place the 1.5 cups dried cannellini beans in a large bowl and cover with plenty of cold water—at least 4 cups—to fully submerge them. Let them soak overnight, or for a quicker method, cover with fresh water and simmer for 2 hours until tender. You'll know they're ready when they crush easily between your fingers with light pressure.
Drain the cooked beans thoroughly and transfer them to a large pot. Add the 0.5 cup filtered water and bring to a gentle boil. Reduce heat to medium-low and let them simmer uncovered for 10 minutes, stirring occasionally. This step ensures all moisture is evaporated, making blending easier and preventing a watery puree.
Roast the Garlic for Depth of Flavor
While the beans cook, preheat your oven to 400°F. Peel the 3 cloves garlic and place them on a small baking sheet lined with parchment paper. Drizzle lightly with 1 teaspoon of the 0.25 cup extra-virgin olive oil and roast for 8-10 minutes until golden and fragrant. This roasting transforms the garlic into a sweet, caramelized flavor that will elevate your puree.
Remove the garlic from the oven and let it cool slightly before transferring to a small bowl. Mash the roasted cloves with a fork until you have a rough paste—this ensures even distribution of flavor in your puree. Set aside until ready to use.
Blend the Beans to Silky Smoothness
Return the cooked beans to the pot and add the mashed roasted garlic, 0.5 teaspoon diamond crystal kosher salt, and 0.25 teaspoon ground black pepper. Stir well to combine all ingredients thoroughly. The beans should be warm but not boiling—this prevents splattering when you blend.
Using an immersion blender, blend the mixture directly in the pot until completely smooth. If you prefer using a countertop blender, transfer the hot mixture in batches (don't overfill), blending until silky smooth with no visible texture. For extra creaminess, add the remaining 0.25 cup extra-virgin olive oil during blending.
Finish with Brightness and Balance
Transfer the puree to a clean bowl and stir in the 2 tablespoons fresh lemon juice. This final step brightens the flavor and balances the richness of the olive oil. Taste and adjust seasoning—you may need to add a pinch more salt or pepper depending on your preference. The puree should be velvety with a vibrant, fresh finish.
For immediate use, serve warm. For storage, transfer to an airtight container and refrigerate for up to 5 days, or freeze for up to 3 months. This puree makes an excellent base for creamy soups, hearty dips, or as a flavorful pasta sauce addition—each spoonful delivers that perfect balance of earthy bean and bright citrus notes.
Pro Tips For Making Cannellini Bean Puree
- Soak Overnight: Skip the quick-soak shortcut—dried cannellini beans need 8–12 hours in water to soften properly. I learned this the hard way after trying the 2-hour method and ending up with a gritty, uneven puree. Use a big bowl, cover with an inch of water, and add a pinch of salt to keep them from bloating.
- Blend in Batches: Cannellini skins clog blenders like crazy. Puree half the beans first, then add the rest with a splash of hot cooking liquid to help break them down. My food processor gave up after one full batch—now I work in two, and the texture is silky every time.
- Roast the Garlic: Raw garlic can overpower the puree. Wrap whole cloves in foil, roast at 400°F for 20 minutes until soft, then peel. The sweet, mellow flavor blends seamlessly—no harsh bite to fight with the lemon. (Yes, even if you’re impatient like me.)
- Strain Twice: After blending, strain through a fine-mesh sieve, then press the pulp with a spoon for extra yield. I used to skip this, but the first pass leaves behind starchy bits that make the puree taste uneven. A second press guarantees smoothness—your future self will notice the difference.
Storing and reheating your cannellini bean puree
Refrigerator Storage
Store your cannellini bean puree in an airtight glass container—I prefer Pyrex with snap-on lids—and keep it in the fridge for up to 5 days.
The olive oil helps preserve freshness, but I still recommend tasting before each use. The puree thickens slightly when chilled, so stir well before reheating. 🥫
Freezer Storage
For longer storage, portion puree into ice cube trays, freeze, then transfer to a freezer bag with 1 inch headspace to prevent freezer burn. Thaw overnight in the fridge before using.
I’ve kept puree frozen for 3 months without texture loss—perfect for batch cooking. Label bags with the date to track freshness.
Reheating Methods
For stove-top reheating, warm puree in a saucepan over low heat with 1-2 tablespoons water to prevent scorching. Stir constantly until just warm—never boil, or it’ll break the silky texture.
Microwave reheating works too: use 50% power for 1-2 minutes, stirring halfway. Always taste and adjust seasoning after reheating.
Preventing Graininess
If your puree develops a slightly grainy texture after storage, simply blend again with 1-2 tablespoons water until smooth. The olive oil emulsion is delicate, so avoid reheating to high temperatures. For extra insurance, add ½ teaspoon extra-virgin olive oil when reheating to restore creaminess. 💡
Make-Ahead Tips
Double the recipe and freeze half—this puree is a game-changer for quick weeknight meals. I keep a small jar in my fridge for instant pasta sauce upgrades or soup bases.
The versatility makes it worth the extra effort, and the flavor only improves with time. Trust me, your taste buds will thank you.
Thickening Adjustments
If the puree separates or thickens too much after storage, thin it with warm water or vegetable broth—1 tablespoon at a time—until you reach your desired consistency.
For soups, a slightly thicker puree works beautifully; for dips, aim for a spoonable but pourable texture. Always taste as you go!
Nutrition facts
Frequently asked questions
Can I use canned beans instead of dried for this puree?
Yes, but you'll need to adjust the water. Use 2 (15-ounce) cans of drained and rinsed cannellini beans and reduce the filtered water to 0.25 cup during cooking. The texture will be slightly different but still creamy. For best results, choose low-sodium beans and rinse thoroughly to avoid excess saltiness.
What are the best ways to use this puree in recipes?
This versatile puree works as a creamy base for soups, pasta sauces, or veggie dips. Stir it into minestrone for extra richness, swirl it into tomato sauce for a velvety finish, or serve it with toasted bread and olive oil as a dip. It also makes a great vegan Alfredo substitute when combined with nutritional yeast and a splash of pasta water.
Why does my puree turn out grainy after blending?
Graininess usually means the beans weren't fully broken down during blending. For smoother results, blend in short bursts with 1-2 tablespoons water between batches. Also, ensure your beans are fully cooked and drained well before blending. If it still happens, add ½ teaspoon olive oil to help emulsify the texture.
Can I make this puree without olive oil?
Yes, but the texture will be less creamy. Replace the olive oil with avocado oil (neutral flavor) or 1 tablespoon nutritional yeast for a cheesy note. For a dairy-free alternative, try 1 teaspoon vegan butter, but the puree may separate when reheated. The olive oil is key for that restaurant-quality creaminess!
How do I adjust the flavor if I don't like lemon?
Swap the lemon juice for 2 tablespoons apple cider vinegar or 1 teaspoon white wine vinegar for tanginess. For a sweeter profile, add ½ teaspoon maple syrup or a pinch of smoked paprika. If you prefer savory, boost the garlic to 4 cloves or add a dash of miso paste. Taste as you go—this puree is your flavor playground!