Side Dishes
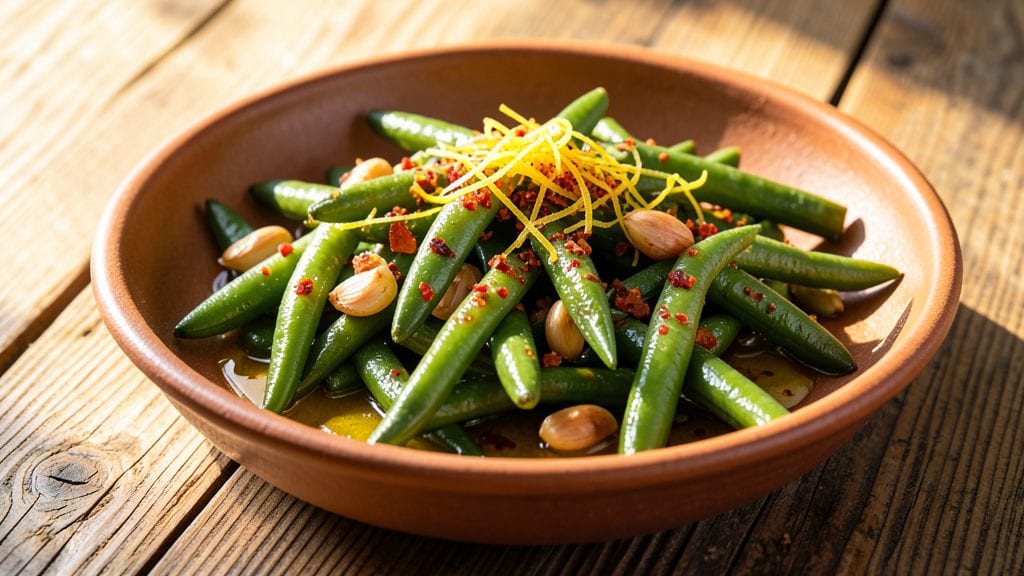
This Roman bean recipe transforms simple green beans into a garlicky, lemon-kissed masterpiece that brings Rome to your dinner table in just 15 minutes. The secret lies in crisp-tender beans tossed with fresh garlic, bright lemon zest, and a touch of chili flakes—simple ingredients that pack a flavor punch.
I first tried this after discovering how Roman trattorias elevate humble beans with bold, aromatic techniques.
The beauty of this dish is its versatility—it works as a standalone side or pairs perfectly with grilled meats, fish, or crusty bread.
What sets it apart is the balance of textures: crisp edges from high-heat cooking meet tender beans, while the lemon and garlic infuse every bite with Mediterranean brightness. No fancy equipment needed—just a skillet and fresh ingredients.
By the time you finish, you’ll have a dish that’s restaurant-quality but ready in a fraction of the time. The aroma alone will draw everyone to the table, and the first bite delivers that perfect harmony of garlicky warmth and zesty freshness.
This is the kind of recipe that makes weeknight dinners feel special without the fuss.
Serve it alongside roasted chicken, seared scallops, or even as a vegetarian main with crusty bread. The method is foolproof, and the flavor is unforgettable—exactly what you need for a quick yet impressive side dish. Let’s get cooking!
Ingredients for roman bean
Eleven ingredients transform humble green beans into a Roman trattoria-worthy side dish.
| Ingredient | Amount | Notes |
|---|---|---|
| Fresh Green Beans 🌿 | 1 ½ lb | Trimmed, ends cut evenly |
| Extra-Virgin Olive Oil 🫒 | 3 tbsp | High-quality, fruity variety |
| Garlic Cloves 🧄 | 6 cloves | Minced, fresh preferred |
| Lemon Zest 🍋 | 1 tbsp | From organic lemons |
| Lemon Juice 🍋 | 1 tbsp | Freshly squeezed |
| Crushed Red Chili Flakes 🌶️ | ½ tsp | Adjust for heat preference |
| Diamond Crystal Kosher Salt 🧂 | ¾ tsp | Fine grain preferred |
| Freshly Ground Black Pepper 🌶️ | ¼ tsp | Freshly cracked |
| Fresh Parsley Leaves 🌿 | ¼ cup | Chopped, for garnish |
| Toasted Pine Nuts 🥜 | ¼ cup | Optional, for crunch |
| Pecorino Romano Cheese 🧀 | ¼ cup | Freshly grated, for finish |
The green beans should be crisp-tender, not mushy—look for bright green, straight pods at the market or grocery store. Whole Foods and Trader Joe's carry excellent quality, but any well-stocked produce section will work. Avoid beans with yellowing ends or soft spots; these indicate age. For the garlic, fresh is non-negotiable—jarred minced garlic lacks the aromatic depth this dish requires. If you're using a whole head, peel and mince the cloves just before cooking to preserve their potency. The lemon should be organic whenever possible, as conventional lemons often have a thicker, less vibrant zest layer.
No extra-virgin olive oil? Light olive oil works in a pinch, though it lacks the fruity complexity. Substituting dried chili flakes for fresh? Use half the amount—fresh chili peppers pack more heat. Short on parsley? Fresh basil or cilantro can stand in, though parsley’s bright, slightly bitter note is traditional. The pine nuts are optional but add a luxurious crunch; walnuts or almonds work if you're avoiding them. For the cheese, Parmigiano-Reggiano is a worthy substitute, though Pecorino Romano offers a sharper, saltier finish that cuts through the richness of the olive oil.
This dish holds up beautifully for 2 days in the refrigerator, though the texture becomes slightly softer. To reheat, warm gently in a skillet with a splash of water and fresh lemon zest. For make-ahead prep, trim and store the beans in a sealed container with a damp paper towel to maintain crispness. The garlic and lemon can be prepped a day ahead, but add the zest and juice just before serving to preserve their brightness. If storing for more than 24 hours, keep the pine nuts and cheese separate until ready to serve to maintain their freshness.
Why You'll Love This Recipe
- Five-Ingredient Magic: I swear by this recipe—just beans, olive oil, garlic, lemon, and a pinch of salt. That’s it. No fancy prep, no hidden pantry staples, just pure, bright flavor with zero fuss.
- Garlic-Lemon Crunch: The moment those crisp-tender beans hit your plate with that zesty lemon and fragrant garlic? Chef’s kiss. The acid cuts through the richness of the olive oil, leaving you with a bite that’s fresh, bold, and impossible to resist.
- Weeknight & Potluck Star: Between us, this is my go-to for lazy dinners when I’m too tired to think. But it also shines at summer BBQs—just toss it in a jar, and it’s a crowd-pleaser that costs next to nothing.
- Leftovers That Don’t Suck: Honestly, I make a double batch on Sundays because the flavor only gets better the next day. Cold or reheated, it’s still crisp, still bright, and still my secret weapon for lazy lunches. (Yes, even on a Tuesday.)
Step-by-step instructions for garlicky, lemon-kissed crunch in 15 minutes
Here's how to transform simple green beans into a vibrant, aromatic Roman-style dish with bright citrus and nutty depth.
Prepare the Green Beans for Perfect Texture
Trim the ends from the 1.5 lb fresh green beans, cutting each piece to an even length of about 2 inches. I like to work in batches—trim one end, then the other, keeping them in a single pile to avoid confusion. This even sizing ensures they cook uniformly and develop that signature Roman crunch.
Spread the trimmed beans on a clean kitchen towel and pat them dry thoroughly. Any moisture left on the beans will steam them instead of allowing them to develop that beautiful caramelized exterior. For best results, work quickly and keep them in a single layer so they dry evenly.
Sauté the Garlic in Olive Oil Until Fragrant
Heat the 3 tbsp extra-virgin olive oil in a large skillet over medium heat until it shimmers but doesn't smoke. Add the 6 cloves minced garlic cloves and cook for 1-2 minutes until they turn golden and release their aromatic oils. This step is crucial—garlic should be fragrant but not browned, as that would create bitterness.
Watch the garlic carefully. If it starts to darken too quickly, reduce the heat slightly. The goal is to infuse the oil with garlic flavor without burning it. Once the garlic is golden and smells heavenly, remove the skillet from heat momentarily—you'll return to it shortly.
Cook the Beans Until Al Dente and Slightly Charred
Return the skillet to medium heat and add the prepared green beans in a single layer. Cook undisturbed for 3-4 minutes, allowing them to develop color and crispness on one side. After the initial sear, stir occasionally for another 5-6 minutes until the beans are tender yet still retain a slight bite—this is the Roman way, where al dente meets char.
You'll know they're ready when the beans are bright green with just a few golden spots and can be pierced easily with a fork. If you prefer them softer, reduce the cooking time slightly. The beans should still have a pleasant resistance when bitten into, not be mushy.
Finish with Lemon, Chili, and Herbs
Remove the skillet from heat and stir in the 1 tbsp lemon zest and 1 tbsp lemon juice. The citrus brightens the dish instantly, cutting through the richness of the garlic and olive oil. Add the 0.5 tsp crushed red chili flakes and toss gently to distribute evenly. This is where the dish comes together—acid, heat, and fresh herbs balance the savory garlic.
Sprinkle with the 0.75 tsp diamond crystal kosher salt and 0.25 tsp freshly ground black pepper. Taste and adjust seasoning—Roman cuisine relies on bold, balanced flavors. The beans should be vibrant, with a punch of garlic, a hint of spice, and a zesty finish.
Garnish and Serve Immediately
Transfer the beans to a serving platter and garnish with the 0.25 cup chopped fresh parsley leaves and 0.25 cup toasted pine nuts. The parsley adds freshness, while the pine nuts contribute a delightful crunch. Finish with the 0.25 cup freshly grated Pecorino Romano cheese, allowing it to melt slightly into the hot beans for a salty, umami depth.
Serve immediately while the beans are still vibrant and the flavors are at their peak. This dish is best enjoyed fresh, with the contrast of warm beans, crispy nuts, and melted cheese. Pair with crusty bread to soak up the garlicky olive oil or serve alongside grilled meats for a complete Roman-style meal.
Pro Tips For Making Roman Bean
- TRIM BEANS LIKE A PRO: Cut them at a 45-degree angle—about 1.5 inches long—and you’ll get even cooking and a prettier plate. Skip the spiralizer unless you’re going for a gimmick; uniform chunks stay crisp and soak up the garlic-lemon oil better.
- SALT THE BEANS FIRST: Toss them with a pinch of salt and let sit 10 minutes before cooking. This draws out moisture so they crisp up instead of steaming into mush—trust me, your future self will notice the difference.
- GARLIC: MINCE, DON’T CHOP: Finely mince the cloves (not slice or crush) so they melt into the oil without turning bitter. If you’re lazy and chop, at least use a very sharp knife—otherwise, you’ll end up with garlic chunks that burn before the beans do.
- LEMON ZEST: USE THE OUTER LAYER: Scrape only the bright yellow part of the zest—no white pith, which adds bitterness. And for the love of garlic, don’t just squeeze the juice; zest first, then juice, or the flavor will taste flat. (Yes, even if you’re impatient like me.)
Essential equipment for roman bean
Skillet Essentials
Your 12-inch cast iron skillet is the star of this recipe—it retains heat perfectly and develops that beautiful caramelized crust on the beans. I use my Lodge Pre-Seasoned Cast Iron Skillet because it’s heavy enough to handle high heat without warping.
If you don’t have cast iron, a stainless steel skillet with a heavy base works well too. Just avoid nonstick—it won’t give you the same texture or flavor development. 🔥
Garlic Tools Matter
For mincing garlic, I swear by a microplane—it creates the finest texture without bruising the cloves. If you don’t own one, a sharp chef’s knife works, but be gentle to avoid crushing. Store-bought minced garlic lacks freshness, so always prep it yourself.
A garlic press is convenient but can release bitter juices, so I avoid it for this dish. Keep your garlic cloves refrigerated until ready to use for maximum aroma.
Lemon Zester Must-Have
A Y-peeler or Microplane is perfect for lemon zest—it removes just the aromatic yellow layer without the bitter white pith. If you’re using a knife, be careful not to cut into the white part. I keep a small glass bowl nearby to catch the zest while I work.
Fresh lemon juice is non-negotiable here—bottled juice lacks the bright acidity that balances the dish. A handheld citrus juicer makes this step effortless if you’re prepping ahead.
Crisp-Tender Timer
Use a kitchen timer set for 3-4 minutes during the initial sear—this ensures your beans develop color without burning. I also recommend a meat thermometer to check doneness (beans should reach 160°F internally). For toasting pine nuts, a small dry skillet over low heat prevents burning.
Keep them moving constantly with a wooden spoon to avoid scorching. A fine-mesh strainer helps drain excess oil if you prefer less greasiness.
Garnish with Precision
Chop parsley with a sharp chef’s knife for even, tiny pieces—this distributes flavor beautifully. Toast pine nuts in a light-colored skillet so you can see when they turn golden. For cheese, a fine grater creates uniform shavings.
I keep all garnishes prepped in small ramekins on the table for easy serving. A tongs helps transfer hot beans to the platter without crushing them. 💫
Optional Upgrades
For extra crunch, toast walnuts instead of pine nuts—they’re more budget-friendly and add earthy depth. A mortar and pestle can crush red chili flakes into a finer powder if you prefer. If you love texture, sprinkle toasted breadcrumbs at the end for a Roman-inspired touch.
For serving, a wooden board adds rustic charm, while a white ceramic platter makes the vibrant green beans pop even more. 🌿
Nutrition facts
Frequently asked questions
Can I use frozen green beans instead of fresh for this Roman-style dish?
Fresh green beans are ideal for their crisp texture, but frozen beans work in a pinch. Thaw them first, then pat them completely dry with a kitchen towel to prevent steaming. Cook them for 1-2 minutes less than fresh beans since they're already partially cooked. The flavor won't be identical, but it's a great backup when fresh beans aren't available.
What's the secret to getting that perfect Roman crunch in the beans?
The key is high heat and proper drying! Pat the beans thoroughly before cooking and use a 12-inch cast iron skillet for even heat distribution. Cook them undisturbed for 3-4 minutes on the first side to develop caramelization, then stir gently. Never overcrowd the pan—cook in batches if needed. The result should be tender yet slightly crisp with golden spots.
How can I make this dish spicier without overpowering the garlic flavor?
Start with 0.5 tsp crushed red chili flakes and adjust to taste. For extra heat without losing balance, add 1/4 tsp finely chopped fresh red chili (like cayenne) or a pinch of cayenne pepper at the end. The lemon zest and fresh parsley will help brighten the heat. If using fresh chili, toast it lightly in olive oil for 30 seconds first to mellow its intensity.
Can I prepare this ahead of time for a dinner party?
Yes, but with some adjustments. Cook the beans completely, then store them in an airtight container in the fridge for up to 2 days. Reheat gently in a skillet with 1 tbsp olive oil and 1 tsp lemon juice until warmed through. Add fresh lemon zest, parsley, and pine nuts just before serving to maintain vibrant flavors. The texture will be softer after reheating, but still delicious.
What's the best way to store leftovers to keep them fresh?
Transfer leftovers to an airtight container and refrigerate for up to 4 days. For best texture, store the beans separately from the garnishes (pine nuts, cheese, parsley) and add them fresh when reheating. To maintain crispness, microwave the beans with a damp paper towel covering them for 20-30 seconds—this adds moisture without making them soggy.