Desserts
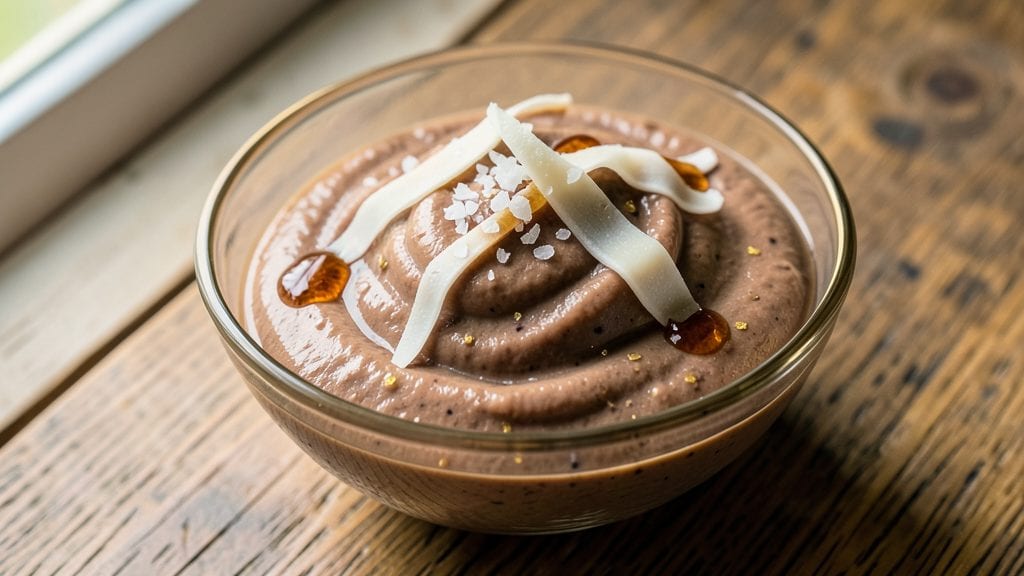
Creating vegan azuki bean ice cream transforms a simple pantry staple into a luxurious, nutty-sweet dessert with Japanese-inspired depth. The process begins with soaking azuki beans until tender, then blending them into a smooth base that captures their natural sweetness and earthy richness.
This isn’t just another plant-based ice cream—it’s a textured, satisfying treat that rivals traditional dairy versions.
The key to success lies in balancing traditional techniques with modern convenience. While agar-agar creates that signature Japanese firmness, an ice cream maker (or even a no-churn method) ensures perfect scoopability without compromising flavor.
The result is a dessert that’s creamy yet light, with subtle hints of caramelized bean notes that develop as it chills.
What makes this recipe stand out is its versatility—add matcha for an earthy twist, swirl in red bean paste for extra sweetness, or enrich with coconut milk for a tropical variation.
Each bite delivers that perfect harmony of nutty depth and velvety texture, proving plant-based desserts can be just as indulgent as they are nutritious.
Whether you’re serving it at a tea ceremony-inspired gathering or simply craving a cool, comforting treat, this azuki bean ice cream delivers restaurant-quality results at home. Let’s get started on creating something truly special.
Ingredients for azuki bean ice cream
Japanese-inspired pantry staples transformed into velvety vegan ice cream perfection.
| Ingredient | Amount | Notes |
|---|---|---|
| Azuki Beans (Dried) 🌾 | 1 cup | Soaked overnight, drained |
| Coconut Milk (Full-Fat, Canned) 🥥 | 13 ½ oz | High quality, unsweetened |
| Maple Syrup 🍯 | ½ cup | Grade B for richer flavor |
| Agar-Agar Powder 🍃 | ¼ tsp | For Japanese-style firmness |
| Vanilla Extract 🌿 | 1 tsp | Pure, alcohol-free preferred |
| Sea Salt 🧂 | ¼ tsp | Fine grain, Diamond Crystal |
| Red Bean Paste (Optional) 🍫 | ¼ cup | For extra sweetness variation |
| Matcha Powder (Optional) 🍵 | 1 tsp | Ceremonial grade preferred |
| Filtered Water 💧 | ½ cup | For blending consistency |
| Coconut Oil (Optional) 🫒 | 1 tbsp | For extra richness |
The azuki beans are the heart of this recipe—high-quality dried beans from Asian markets or specialty stores deliver the deepest flavor. Soak them overnight in plenty of water (about 8 cups for 1 cup beans) to soften completely. The coconut milk should be full-fat and unsweetened; brands like Thai Kitchen or Native Forest work beautifully. For the agar-agar, Japanese brands like Koyo are ideal if available, but any high-quality powdered agar will work. The maple syrup should be Grade B for its robust, caramel-like notes that complement the beans perfectly.
No coconut milk? Full-fat cashew cream (soaked cashews blended with water) works as a neutral substitute, though it lacks the tropical depth. Short on agar-agar? Tapioca starch at double the amount creates a softer texture, though not as firm. The red bean paste can be replaced with black sesame paste for nutty contrast, or simply omit for a lighter texture. Matcha powder should be ceremonial grade—culinary grade is too bitter. For the vanilla, alcohol-free extracts like Frontier Co-op ensure no competing flavors. The coconut oil is optional but adds luxurious mouthfeel if you prefer a richer texture.
Store the base mixture in an airtight container in the fridge for up to 5 days before churning. Once churned, the ice cream keeps for 1 week in an airtight container with parchment between layers. For longer storage, freeze in portions for up to 3 months. Let it sit at room temperature for 10 minutes before scooping to achieve perfect texture. The flavor actually improves after 24 hours as the beans release more sweetness and the agar sets fully.
Why You'll Love This Recipe
- No-Soaking Hassle: I’ll be real—soaking beans for hours? Not anymore. This recipe uses dried azuki beans that cook in under 30 minutes with a pressure cooker (or 1.5 hours on the stove), and the texture is buttery smooth—no gritty surprises.
- Sweet & Nutty Magic: That first spoonful of warm azuki bean puree mixed with coconut milk and maple syrup? It’s like dessert meets comfort food. The agar-agar gives it a silky, almost custard-like finish, and the vanilla ties it all together—rich without being cloying.
- Make-Ahead Dream: Freeze it in small containers, and you’ve got instant treats for picnics, potlucks, or lazy Sundays. Honestly, I’ve kept a batch in my freezer for months—it’s my go-to for when I need something special but don’t want to bake.
- Budget Luxury: A can of coconut milk and a bag of dried azuki beans cost less than store-bought ice cream, but the flavor? Chef’s kiss. No artificial junk, just pure, creamy sweetness that tastes like you slaved over it (even though you didn’t).
Step-by-step instructions for azuki bean ice cream recipe
Transform simple ingredients into velvety azuki bean ice cream with a perfect Japanese-inspired texture.
Soak and Cook the Azuki Beans
Begin by soaking the 1 cup of azuki beans in plenty of cold water for at least 8 hours or overnight. This ensures they soften properly and cook evenly. Drain and rinse thoroughly before transferring to a saucepan with fresh water—use enough to cover the beans by 2 inches.
Bring to a boil over high heat, then immediately reduce to a simmer. Cook for 45-60 minutes until the beans are tender but not mushy. You'll know they're ready when they collapse easily under gentle pressure with a fork. Drain well and set aside to cool completely before blending.
Blend the Base Mixture
In a high-powered blender, combine the cooked azuki beans with the 0.5 cup of maple syrup, 13.5 oz of coconut milk, 0.5 cup of filtered water, and 1 tsp of vanilla extract. If using, add the 1 tsp of matcha powder or 0.25 cup of red bean paste at this stage for enhanced flavor. Blend until completely smooth, scraping down the sides as needed.
For extra richness, melt the 1 tbsp of coconut oil in a small saucepan over low heat, then stir it into the warm mixture. This step creates a silkier texture and deeper flavor. Taste and adjust sweetness with additional maple syrup if needed, keeping in mind the agar-agar will intensify flavors as it sets.
Incorporate Stabilizer and Salt
In a small bowl, whisk together the 0.25 tsp of agar-agar powder with 2 tablespoons of cold water from the filtered water amount until completely dissolved. This creates a smooth slurry that will evenly distribute through the mixture. With the blender running on low speed, slowly pour in the agar-agar mixture.
Add the 0.25 tsp of sea salt and blend for an additional 30 seconds to ensure complete integration. The agar-agar will begin to thicken the mixture slightly—this is normal and essential for achieving that signature Japanese ice cream texture. Transfer the mixture to a clean bowl and let it cool to room temperature.
Churn the Ice Cream
Pour the cooled mixture into an ice cream maker and churn according to the manufacturer's instructions, typically for 20-25 minutes. The ice cream will thicken significantly as it churns, forming a creamy, smooth texture. If your ice cream maker doesn't have a self-eject function, transfer the mixture to a freezer-safe container.
For best results, freeze the ice cream for at least 4 hours or until completely firm. This extended freezing time allows the agar-agar to fully set, creating that perfect scoopable consistency. The final texture should be smooth with a subtle nutty sweetness from the azuki beans and a delicate creaminess from the coconut milk.
Serve and Enjoy
Let the ice cream sit at room temperature for 5-10 minutes before scooping to achieve clean, elegant servings. The texture should hold its shape when scooped but still be creamy on the tongue. For presentation, garnish with a sprinkle of matcha powder or a drizzle of maple syrup if desired.
This azuki bean ice cream delivers a sophisticated balance of nutty, sweet, and creamy flavors with a texture that's both luxurious and refreshing. The Japanese-inspired technique ensures a product that's far superior to traditional ice creams, with a smoothness that will impress even the most discerning palates.
Pro Tips For Making Azuki Bean Ice Cream
- Soak Beans Overnight: I learned this the hard way—rushing soaks leaves gummy, uneven beans. Toss dried azuki beans in cold water for at least 8 hours (or overnight) with a pinch of salt. This guarantees they soften evenly and blend into silkier ice cream without grit.
- Simmer Coconut Milk Low: Full-fat coconut milk curdles fast when you push the heat. Reduce it on medium-low, stirring often, until it thickens to pudding consistency—about 15 minutes. If it splits, strain it immediately or your ice cream will taste off.
- Blend Hot, Not Scalding: Hot liquid + agar-agar = clumping disaster. Let your blended bean-coconut mix cool to warm (about 100°F/38°C) before adding agar-agar, then whisk it into the hotter portion. This keeps the texture smooth instead of stringy.
- Sweeten Gradually: Maple syrup burns easier than you’d think. Start with half the recipe’s amount, taste, then add the rest while blending—this prevents overpowering the natural bean sweetness. A splash of vanilla at the end balances it better.
Creative variations of these flavors
Matcha Green Tea Twist
Add 1-2 tsp ceremonial-grade matcha powder to the base mixture for an earthy, vibrant green variation that pairs beautifully with the azuki beans' natural sweetness. I like to whisk the matcha with 2 tbsp hot water first to create a smooth paste before blending it into the coconut milk mixture.
This ensures even distribution and prevents clumping. The result is a visually stunning ice cream with a subtle umami depth that complements the nutty azuki flavor. 🍵
Red Bean Swirl
For a classic Japanese-inspired variation, stir ¼ cup sweet red bean paste (anko) into the base mixture before churning. The natural sweetness of the red beans enhances the azuki flavor while adding beautiful marbled texture.
I recommend using high-quality azuki red bean paste from Japanese specialty stores for the best results. For a more intense flavor, gently warm the paste with 1 tsp water before mixing to make it easier to incorporate. 🍫
Coconut Milk Variations
Swap the full-fat coconut milk for cashew cream (blend 1 cup soaked cashews with 1 cup water) for a neutral base that lets the azuki flavor shine. Alternatively, use almond milk for a lighter texture, though the coconut milk provides the richest mouthfeel.
For tropical inspiration, add 1 tsp toasted coconut flakes to the base before churning. The coconut flavor harmonizes perfectly with the beans' nutty notes. 🥥
Spiced Vanilla Version
Infuse the base with warm spices by adding ½ tsp ground cinnamon and ¼ tsp cardamom to the blender along with the vanilla extract. These spices complement the azuki's natural sweetness while adding aromatic warmth.
I also like to include 1 tsp bourbon or rum for a boozy twist that enhances the vanilla notes. The spices should be finely ground to avoid texture issues in the final product. 🌿
No-Churn Option
Skip the ice cream maker by preparing a no-churn version: mix the cooled base with 1 cup cold heavy cream or coconut cream and fold in 1 cup whipped coconut cream until thick. Freeze in a loaf pan for 6 hours, then slice into bars.
This method works especially well for the matcha or spiced variations where texture is slightly less critical. The result is still creamy but requires less equipment. ❄️
Seasonal Fruit Add-Ins
Fold in ½ cup finely diced mango or passionfruit pulp into the churned ice cream for a tropical variation that brightens the nutty azuki flavor. For autumn, try roasted sweet potato puree** (about ¼ cup) mixed into the base before churning.
The fruit adds vibrant color and natural sweetness that balances the earthy bean notes. Add the fruit just before freezing to preserve freshness and texture. 🍉
Nutrition facts
Frequently asked questions
Can I use canned azuki beans instead of dried?
Canned azuki beans work in a pinch, but they lack the rich, nutty depth of dried beans. For best flavor, always use dried beans soaked overnight. If you must use canned, drain and rinse thoroughly, then blend with extra 1-2 tbsp maple syrup to compensate for the less intense flavor. The texture will be slightly softer but still delicious.
Why does my azuki bean ice cream turn out grainy?
Graininess usually happens when beans aren't blended smooth enough or the mixture isn't cooled properly before churning. Use a high-powered blender and strain through a fine-mesh sieve if needed. Also ensure your base is completely chilled (not warm) before adding to the ice cream maker—warm mixtures create ice crystals during churning.
How can I make this recipe nut-free?
Swap the coconut milk for oat milk (full-fat preferred) and use 1 tbsp cornstarch instead of agar-agar for stabilization. The texture will be slightly softer but still scoopable. For extra creaminess, add 2 tbsp refined coconut oil (nut-free) to the base. Always check labels on all ingredients for hidden nut traces.
Can I make this without an ice cream maker?
Use the no-churn method: whip 1 cup coconut cream until stiff peaks form, then fold into your chilled base mixture. Freeze in a loaf pan for 6 hours, then slice into bars. For firmer texture, add 1 tsp tapioca starch to the base before freezing. The result will be creamier but slightly less smooth than machine-churned versions.
What's the best way to store leftovers?
Transfer scooped portions to an airtight container with parchment paper between layers to prevent freezer burn. Chilled leftovers keep for 1 week in the freezer, while frozen portions last 3 months. For best texture, let sit at room temperature for 5-10 minutes before serving—this prevents ice crystals from forming when scooped.