Side Dishes
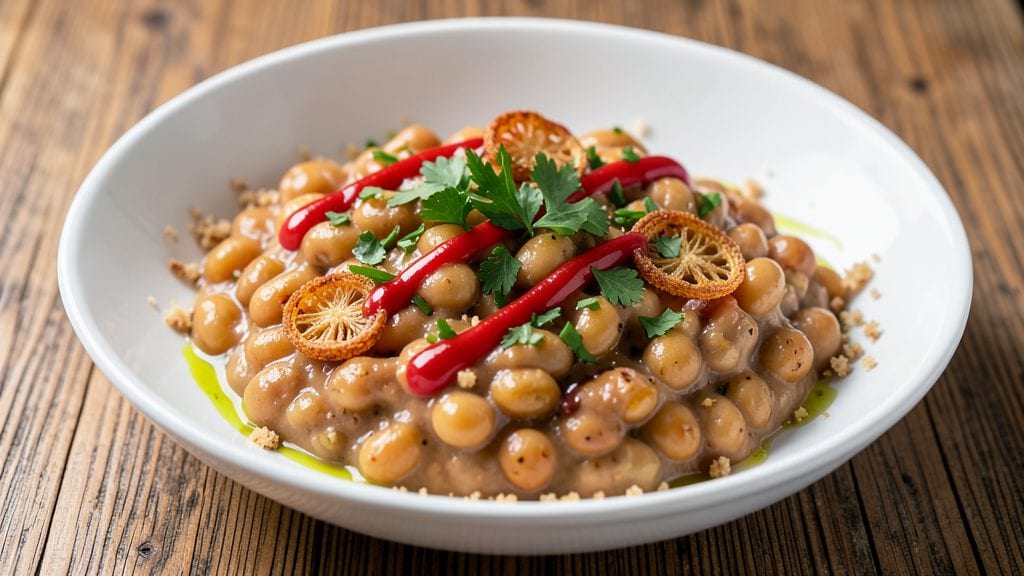
Transforming Bush’s cannellini beans into a creamy, protein-packed side dish is simpler than you think—this recipe delivers restaurant-quality results in just 20 minutes.
The secret lies in blending cooked beans with garlic, olive oil, and a splash of lemon juice, creating a velvety texture that pairs perfectly with grilled meats or crusty bread. I’ve perfected this method over countless weeknight dinners, and it never fails to impress.
What sets this dish apart is its versatility—whether you’re craving a quick Tuscan-inspired stew or a smooth dip for game day, the same base ingredients deliver. The beans soften effortlessly in 15 minutes of simmering, while garlic and herbs infuse rich, aromatic depth.
No fancy techniques required; just a pot, a blender, and a few pantry staples.
By the time you’re done, you’ll have a creamy, protein-rich side that’s smooth, flavorful, and ready in a fraction of the time it takes to order takeout. The texture is velvety without being heavy, and the taste?
A perfect balance of savory, herby, and slightly tangy. This is the kind of dish that elevates any meal—no fuss, all flavor.
Serve it warm alongside roasted chicken, drizzled over salads, or even as a dip with toasted baguette slices. The possibilities are endless, but the method stays simple. Let’s get cooking—your taste buds will thank you.
Ingredients for bush's cannellini beans
Pantry staples meet fresh flavors—just 12 ingredients for velvety, restaurant-style cannellini magic.
| Ingredient | Amount | Notes |
|---|---|---|
| Bush's Cannellini Beans 🍲 | 15 oz | Drained and rinsed |
| Extra-Virgin Olive Oil 🫒 | ¼ cup | High quality, fruity |
| Garlic Cloves 🧄 | 3 cloves | Peeled and minced |
| Fresh Lemon Juice 🍋 | 2 tbsp | Freshly squeezed |
| Vegetable Broth 💧 | ½ cup | Low-sodium preferred |
| Fresh Parsley Leaves 🌿 | ¼ cup | Chopped, loosely packed |
| Fresh Thyme Leaves 🌿 | 1 tsp | Or 0.25 tsp dried |
| Salt 🧂 | ½ tsp | Kosher or sea salt |
| Black Pepper 🌶️ | ¼ tsp | Freshly ground |
| Unsalted Butter 🧈 | 1 tbsp | Cold, for richness |
| Red Pepper Flakes 🌶️ | ¼ tsp | Optional, for heat |
| Crusty Bread 🍞 | 4 slices | For serving (optional) |
Bush's cannellini beans are the star here—the 15-ounce can is perfect for this recipe. Grab the no-salt-added version if you're watching sodium, but regular works too. For the olive oil, Trader Joe's or Whole Foods have great fruity options that won't overpower the dish. The garlic should be freshly minced—pre-minced jarred garlic has a weird aftertaste. If you're short on time, frozen garlic cubes work in a pinch, but fresh is always better. The parsley and thyme? Fresh is ideal, but dried works at one-third the amount if that's what you've got.
No fresh parsley? Spinach or cilantro gives a similar bright note. Short on thyme? Oregano or basil at the same amount works great. The vegetable broth can be swapped for water plus a bouillon cube if needed. For extra richness, add 1 tbsp of tahini or a splash of white wine. The butter adds a luxurious touch—use full-fat for best texture. If you want it spicier, add 0.5 tsp of cayenne instead of the red pepper flakes. The lemon juice is key—don't skip it, it brightens everything up.
This keeps beautifully in the fridge for 4-5 days—the flavors actually deepen overnight. For leftovers, just reheat with a splash of water or broth to loosen it up. Freezes for 3 months too, though the texture gets slightly grainier after thawing. I always make a double batch—one for dinner, one to freeze for lazy days. Serve it warm with crusty bread or drizzled over salads. The bread slices? Toast them first so they don't get soggy.
Why You'll Love This Recipe
- Pantry-to-Table Magic: I swear by this recipe because it starts with a can of beans—no soaking, no waiting. Just open, drain, and toss with olive oil, garlic, and lemon while dinner debates play out in the background.
- Garlic-Lemon Zing: That bright citrus cut through the richness of the olive oil and beans, while the garlic—sautéed just until fragrant—adds a punch without overpowering. It’s the kind of flavor that makes you pause mid-bite.
- Dinner Party Ready: Serve it warm as a soup with crusty bread, or let it cool for a chilled salad with greens and feta. Honestly, I’ve even used it as a dip for roasted veggies at summer gatherings—no one ever guessed it was this easy.
- Budget-Friendly Staple: A single can of Bush’s beans stretches into lunches, dinners, and even a quick pasta sauce. Between us, this is how I feed my family for under $2 a serving without sacrificing taste.
Step-by-step instructions for creamy cannellini bean preparation
This method transforms simple canned beans into a velvety, flavor-packed side that's ready in minutes.
Sauté Garlic in Olive Oil Until Fragrant
Heat the 0.25 cup extra-virgin olive oil in a medium saucepan over medium heat. Add the 3 minced garlic cloves and cook for 1-2 minutes until they turn golden and release their aroma. You'll know it's ready when the kitchen smells like fresh garlic—this is your cue to move quickly before it burns.
I like to use a light hand with the garlic so it doesn't darken. If you notice any brown spots, immediately reduce the heat to medium-low. The garlic should be soft but not crispy—just fragrant enough to infuse the entire dish with flavor.
Add Beans and Broth to Create Creamy Base
Drain and rinse the 15 oz Bush's cannellini beans to remove any excess sodium, then add them to the saucepan with the garlic. Pour in the 0.5 cup vegetable broth and bring everything to a gentle simmer over medium heat. You'll see the beans start to warm through almost immediately.
Let this simmer uncovered for 5-7 minutes, stirring occasionally. The beans will begin to break down slightly, releasing their natural starches which will create that creamy texture we're after. This is where the magic happens—don't rush this step or the sauce won't develop properly.
Finish with Lemon, Herbs, and Butter
Remove the saucepan from heat and stir in the 2 tbsp fresh lemon juice, 1 tsp fresh thyme leaves, 0.25 cup chopped parsley, 0.5 tsp salt, and 0.25 tsp black pepper. Add the 1 tbsp cold unsalted butter and stir until melted and fully incorporated. The acidity from the lemon will brighten all the flavors while the butter adds richness.
If you're using the 0.25 tsp red pepper flakes, sprinkle them in now for a subtle heat. Taste and adjust seasoning—you might need a touch more salt or lemon depending on your broth. The mixture should be creamy with just a slight sheen of oil on top, indicating perfect texture.
Serve Warm with Crusty Bread
Transfer the creamy bean mixture to serving bowls and let it sit for 2-3 minutes while you warm the 4 slices crusty bread in the oven or toaster. The beans will continue to thicken slightly as they cool, so don't worry if it looks a bit loose when you first serve it.
Spoon the beans over the warm bread or serve them alongside as a protein-rich side. Each bite should deliver that perfect balance of creamy texture, bright lemon, and herby depth. This dish is especially satisfying when served with grilled meats or as a vegetarian main course.
Pro Tips For Making Bush'S Cannellini Beans
- CRACK THE GARLIC FIRST: Open those cloves with the flat side of your knife—no need to peel them yet. Mince them right there in the pan while they’re fresh, so they hit the oil hot and golden instead of turning to mush. (I used to peel first and always ended up with bitter, overcooked garlic. Lesson learned.)
- SALT THE BROTH LIKE THE SEA: Taste that vegetable broth before you pour it in—it’s usually bland. Add ½ teaspoon salt per cup now, not later. Cannellini beans soak up flavor like a sponge, and you can’t fix flat broth after the fact. (Yes, even if the packet says “low-sodium.”)
- DRAIN AND RINSE THE BEANS: Skip the can’s liquid—it’s murky and metallic. Drain the beans, then give them a quick cold-water rinse to cut any gummy residue. This keeps your dish bright and clean, not cloudy. (I know, it’s an extra step, but trust me: your sauce will thank you.)
- FINISH WITH ZEST, NOT JUST JUICE: After squeezing in that lemon juice, grab a microplane and add a strip of zest—just a teaspoon, but it brightens the whole dish. The juice gives acidity; the zest adds depth. (I used to skip this and wonder why my beans tasted flat. Now I don’t.)
Make-ahead tips for this recipe
Prep Ahead for Flavor
I always prep the garlic and herbs first—chop the 3 garlic cloves and 0.25 cup parsley while the beans warm. Store them in a small airtight container with a damp paper towel to keep fresh for up to 2 days in the fridge.
This saves 10 minutes of prep time during cooking. 🌿
Make Creamy Base First
Cook the beans and broth together in a saucepan for 5-7 minutes—this creates the creamy foundation. Transfer the warm mixture to a blender or food processor and blend until smooth.
Store this base in an airtight container for up to 3 days in the fridge. The texture stays creamy when reheated gently.
Freeze for Quick Meals
For long-term storage, freeze the creamy bean base in 1-cup portions in silicone molds or freezer bags. Thaw overnight in the fridge, then finish with fresh lemon juice and herbs just before serving. The flavor remains rich, though the texture may separate slightly—just stir vigorously to restore creaminess. ❄️
Herb Infusion Trick
If you’re prepping ahead, steep the 1 tsp thyme and 0.25 cup parsley in 0.5 cup warm broth for 10 minutes before blending. Strain and store the infused liquid separately—it adds depth to the final dish without wilting when reheated.
Reheat Like a Pro
Reheat the creamy beans on the stovetop over low heat with 1-2 tbsp water or broth to prevent drying. Avoid microwaving—it makes the beans rubbery. Stir in fresh lemon juice and butter just before serving to revive the flavors. The result? A dish that tastes homemade, not reheated. 🔥
Double Batch Hack
Make twice the recipe and freeze half for future meals. Label containers with the date—this creamy bean mixture stays fresh for 3 months in the freezer. It’s perfect for lazy weeknights or last-minute entertaining when you need a quick, protein-packed side. 💡
Nutrition facts
Frequently asked questions
Can I use dried cannellini beans instead of Bush's canned beans?
For dried beans, soak 1 cup overnight, then simmer for 1.5-2 hours until tender. Use the same recipe ratios, but add extra broth (about 1 cup) to account for moisture loss. Dried beans create a thicker, heartier texture—perfect for stews or dips.
How do I make this recipe vegan?
Swap the butter for 1 tbsp vegan butter or olive oil and use a plant-based broth. Keep all other ingredients the same—the lemon, garlic, and herbs already make this naturally vegan-friendly. For extra richness, stir in 1 tbsp nutritional yeast at the end.
Why did my beans turn out too thick?
This usually happens from over-simmering or not enough liquid. For next time, reduce simmer time to 3-5 minutes and add 2-3 tbsp extra broth if needed. If it's too thick now, thin with a splash of water or lemon juice while reheating.
Can I add other vegetables to this recipe?
Yes! Sauté 1 diced bell pepper or 1 cup spinach with the garlic for added color. For heartier sides, stir in 1 cup diced tomatoes with the beans. Just add them after the initial simmer to preserve texture.
What's the best way to serve this creamy bean dish?
This recipe works as a side with grilled chicken, fish, or roasted veggies. For a main course, serve over toasted bread or with crusty crostini. It also makes an excellent dip—pair with carrot sticks or pita chips for game day.