
Side Dishes
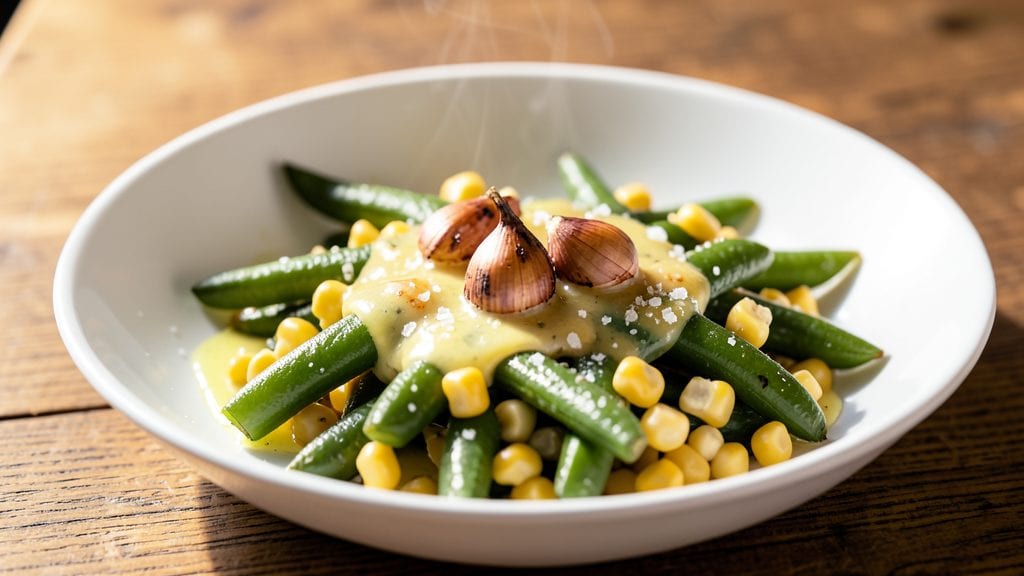
Transforming canned green beans and corn into a bright, buttery side dish is one of those simple kitchen victories that makes weeknight dinners feel special. This 15-minute one-pan recipe proves you don’t need fresh ingredients to create something restaurant-worthy—just a skillet, a few pantry staples, and a little technique.
I developed it after realizing how often I reached for canned vegetables only to end up with bland, watery results.
The secret lies in high-heat sautéing to evaporate excess liquid while building flavor through butter, garlic, and a touch of lemon. Unlike recipes that rely on heavy cream or cheese, this version stays light yet deeply satisfying, with a texture that’s crisp-tender rather than mushy.
The butter adds richness without overpowering the natural sweetness of the corn or the earthy notes of the green beans.
What you’ll end up with is a vibrant, golden side dish that pairs perfectly with grilled meats, roasted chicken, or even as a standalone vegetarian meal.
The aroma of garlic and butter sizzling in the pan fills the kitchen, while the final dish delivers a balance of bright, buttery, and slightly tangy flavors that elevate any plate.
This is the kind of recipe that makes you question why you ever bought fresh when canned works just as well.
Best of all, it’s foolproof—no overcooking, no soggy vegetables, and no complicated steps. Whether you’re feeding a family or prepping for a potluck, this one-pan method ensures you’ll have a delicious, restaurant-quality side ready in record time. Let’s get cooking!
Ingredients for canned green beans and corn
Pantry staples and canned veggies transform into a restaurant-worthy side with butter, garlic, and lemon.
| Ingredient | Amount | Notes |
|---|---|---|
| Canned Green Beans 🌱 | 15 oz | Drained, liquid reserved for sauce |
| Canned Corn Kernels 🌽 | 15 oz | Drained, liquid reserved for sauce |
| Unsalted Butter 🧈 | 4 tbsp | Full-fat for best flavor |
| Garlic Cloves 🧄 | 3 cloves | Minced, fresh preferred |
| Lemon Juice 🍋 | 1 tbsp | Freshly squeezed |
| Salt 🧂 | ½ tsp | Kosher or sea salt |
| Black Pepper 🌶️ | ¼ tsp | Freshly ground preferred |
| Dried Thyme 🌿 | ¼ tsp | Or 1 tbsp fresh thyme |
| Vegetable Broth 💧 | ¼ cup | Low-sodium preferred |
| Extra-Virgin Olive Oil 🫒 | 1 tbsp | For finishing drizzle |
| Fresh Parsley 🌿 | ¼ cup | Chopped, for garnish |
The butter is non-negotiable here—unsalted, full-fat gives that rich, golden finish. I grab mine from Land O'Lakes or Plugrá when I need a big batch, but any good-quality brand works. Fresh garlic makes all the difference, but if you're short on time, jarred minced garlic (the kind in olive oil) works in a pinch. Just drain it well. The canned veggies? Green Giant or Del Monte are my go-tos—they drain well and don’t leave weird aftertastes. Look for low-sodium versions if you’re watching salt intake, but I usually go for regular since we’re balancing it with broth anyway.
No fresh thyme? Dried works at one-third the amount, but fresh is worth hunting down at Trader Joe’s or your local farmers market. The parsley is just for looks—skip it if you’re in a rush, but I always grab extra since it’s so versatile. Out of vegetable broth? Water plus a pinch of bouillon gets you close, but the flavor won’t be as deep. The corn and green beans’ liquid is gold—don’t dump it! Use it to thin the sauce if needed. And if you’re worried about soggy veggies, high heat is your friend. Sear those beans and corn for 2-3 minutes before adding liquid—they’ll hold up perfectly.
This keeps for 3 days in the fridge, but honestly, it’s best eaten fresh while still warm. The butter gets a little grainy if reheated, so I like to make just enough for what I’ll eat that night. For potlucks, portion it into small containers—mason jars are perfect—and it reheats beautifully. If you make extra, freeze portions for up to 3 months. Just thaw in the fridge overnight and reheat gently on the stove.
Why You'll Love This Recipe
- Pantry-to-Table Magic: I swear by this one—no fresh produce needed, just open cans, melt butter, and boom. The only prep is draining the beans and mincing garlic, which takes less time than waiting for the kettle to boil.
- Bright & Buttery Balance: That lemon juice cuts through the richness of the butter, while the garlic adds warmth—like a summer picnic in your mouth. The corn stays sweet, the beans get tender, and the whole thing tastes like a restaurant side but made in 10 minutes.
- Weeknight Workhorse: I toss this with grilled chicken for dinner, serve it cold in sandwiches for lunch, or even spoon it over toast with a fried egg. (Yes, even on a Tuesday night.) It’s the kind of side that works everywhere without trying too hard.
- Zero-Waste Leftovers: Honestly, it’s hard to eat this all in one sitting—so I double the batch and stash it in the fridge. The flavors only get better the next day, and it reheats like a dream. Budget-friendly? Absolutely. Stress-free? Even more so.
Step-by-step instructions for bright, buttery one-pan green beans and corn
Here's how to transform simple canned veggies into a rich, flavorful side that shines on any table.
Sauté Garlic in Butter Until Fragrant
Melt 4 tablespoons unsalted butter in a large skillet over medium heat. Once the butter foams and subsides, add the 3 minced garlic cloves. Cook for 1-2 minutes until the garlic becomes golden and releases its irresistible aroma—this is your flavor foundation. Be careful not to let it burn; it only takes seconds to go from perfect to bitter.
Here's the thing—this step makes all the difference. The butter should coat the back of a spoon and smell nutty, not raw. If you smell anything burning, reduce the heat immediately. Once the garlic is golden, you're ready for the next step without any waiting.
Add Vegetables and Cook Until Tender-Crisp
Drain the 15 ounces canned green beans and 15 ounces canned corn kernels, reserving the liquid in a small bowl. Add both to the skillet with the garlic butter. Stir gently to combine, then sprinkle with 0.5 teaspoon salt, 0.25 teaspoon black pepper, and 0.25 teaspoon dried thyme. Cook for 4-5 minutes until the vegetables are heated through and just beginning to soften at the edges.
You'll know they're ready when the beans are tender but still hold their shape, and the corn starts to look slightly glossy. This is the perfect balance—too long and they'll turn mushy. The reserved liquid from the cans will help create a light sauce later, so don't drain it completely.
Deglaze and Simmer for Rich Flavor
Pour in the 0.25 cup vegetable broth and the 1 tablespoon lemon juice. Stir everything together and let it simmer for 3-4 minutes until the liquid reduces slightly and coats the vegetables. The mixture should look glossy and slightly thickened, with the flavors melding beautifully. If it looks too dry, add a splash of water or the reserved can liquid to loosen it.
This is where the magic happens—the lemon juice brightens everything while the broth deepens the flavor. Taste as you go and adjust seasoning if needed. The vegetables should be tender but still have a satisfying bite—this is what makes them perfect as a side dish.
Finish with Butter and Garnish
Remove the skillet from heat and stir in the remaining 2 tablespoons unsalted butter (you'll use all 4 tablespoons total). Drizzle with 1 tablespoon extra-virgin olive oil and toss everything together until the vegetables are coated in the rich, golden butter mixture. The skillet should smell incredible at this point—like a summer garden with a touch of lemon.
Finally, sprinkle with 0.25 cup chopped fresh parsley and give it one last stir. The parsley adds a fresh pop of color and brightness that makes the dish look as good as it tastes. Serve immediately while the butter is still melted and glossy over the vegetables.
Pro Tips For Making Canned Green Beans And Corn
- Drain and Rinse Cold: The beans and corn come packed in liquid—skip pouring that salty, starchy mess into your pan. Drain them into a colander, then rinse under cold water for 10 seconds to cut the bitterness from the canning brine. I learned this the hard way after serving a batch that tasted like it came straight from the factory.
- Melt Butter Slow: Don’t blast the butter on high or it’ll burn before the garlic gets a chance to sing. Warm the pan over medium-low, let the butter melt completely, then add the minced garlic. The garlic should sizzle gently—not brown—so you get sweet, aromatic flavor instead of bitter bits. (Yes, even if you’re impatient like me.)
- Crush Half the Garlic: Most recipes call for mincing all the garlic, but I’ve found crushing half of it releases more flavor without overpowering. Toss in the whole cloves first, let them bloom for 30 seconds, then add the minced for a deeper, layered taste. The texture contrast is subtle but noticeable.
- Finish with Hot Juice: Lemon juice added at the end loses its zing when simmered too long. Heat the juice in a small saucepan for 10 seconds, then pour it over the beans and corn just before serving. The bright acidity cuts through the butter’s richness instantly—no waiting for it to warm through. (Your future self will thank you.)
Serving suggestions for this recipe
Classic Protein Pairings
This bright, buttery side dish pairs beautifully with grilled chicken breast or herb-roasted chicken thighs—the lemon and thyme flavors complement the savory meat perfectly.
For a heartier meal, serve alongside seared pork chops or smoked sausage like Johnsonville brats, where the corn adds a satisfying sweetness that balances the richness. 🍗
If you're serving steak, especially ribeye or sirloin, the buttery green beans and corn cut through the fat beautifully. I like to add a sprinkle of crumbled feta cheese to the dish when serving with steak for extra depth.
For a vegetarian option, pair it with garlic mashed potatoes or crusty sourdough bread to soak up all the flavor.
Vegetarian and Vegan Adaptations
To make this dish vegetarian, simply omit the butter and use olive oil or vegan butter like Miyoko’s instead. For extra protein, stir in white beans or chickpeas during the final simmer.
The dish still holds up beautifully—just skip the butter finish and drizzle with extra-virgin olive oil and a pinch of red pepper flakes for heat. 🌱
For a vegan version, replace the butter with vegan butter or coconut oil and use vegetable broth instead of chicken broth. The lemon and thyme keep it bright and flavorful without relying on animal products. Garnish with toasted pumpkin seeds for a crunchy texture that adds a nice contrast.
Garnish and Presentation Tips
Fresh herbs are key for presentation—chopped parsley or cilantro add a pop of color and freshness. For a rustic touch, sprinkle with toasted breadcrumbs or crushed cornflakes right before serving.
If you want a smoky twist, finish with a pinch of smoked paprika or a drizzle of hot honey for a sweet-spicy contrast. 🌟
For an elegant touch, serve in a skillet or cast-iron pan straight from the stove—it keeps everything warm and makes the dish look like it came from a restaurant. If plating individually, use small white bowls or slate plates to highlight the vibrant green and yellow colors.
A squeeze of lemon wedge on the side lets guests add brightness to their taste.
Meal Prep and Serving Strategies
This dish reheats beautifully, making it perfect for meal prep. Portion into glass containers with tight-sealing lids and store in the fridge for up to 3 days.
When reheating, cover with a lid and warm on the stove over medium-low heat for 3-4 minutes, stirring occasionally to redistribute the butter. Avoid microwaving—it can make the butter separate and the dish look greasy. ❄️
For potlucks or family gatherings, serve in a large bowl or cast-iron skillet at the center of the table so everyone can help themselves. If you’re serving it as a side salad, toss it with mixed greens and a balsamic vinaigrette for a refreshing twist.
The key is to serve it warm—cold butter makes the dish taste flat and unappetizing.
Nutrition facts
Frequently asked questions
Can I use frozen green beans and corn instead of canned?
Yes, but you'll need to thaw them first. Spread frozen veggies on a paper towel and let them sit for 10-15 minutes before cooking. Since frozen versions contain less liquid, you may need to add an extra 2 tablespoons of broth to maintain the same texture. The flavor will be slightly different but still delicious!
How do I prevent the green beans from turning mushy?
High heat is your best friend! Cook the drained beans and corn over medium-high heat for just 4-5 minutes before adding liquid. This ensures they stay crisp-tender. Also, avoid overcrowding the pan—work in batches if needed. The reserved can liquid helps create a light sauce without overcooking the veggies.
What can I do if my dish tastes too bland?
Boost the flavor with a pinch of smoked paprika, extra lemon juice, or a splash of soy sauce (just ½ teaspoon). For depth, stir in 1 tablespoon of cream cheese or crumbled bacon at the end. The butter finish should already add richness, but these tweaks elevate it further!
Can I make this dish ahead of time?
Store in an airtight container in the fridge for up to 3 days. Reheat gently on the stove over medium-low heat for 3-4 minutes, stirring occasionally. Avoid microwaving—it can make the butter separate. For best results, reheat just before serving to maintain that buttery shine.
What’s the best way to serve this as a vegetarian main dish?
Add ½ cup cooked white beans or chickpeas for protein, and top with toasted breadcrumbs or avocado slices. Serve with a side of crusty bread or a simple quinoa salad to round out the meal. The buttery flavors stand up well as a hearty vegetarian option!