Side Dishes
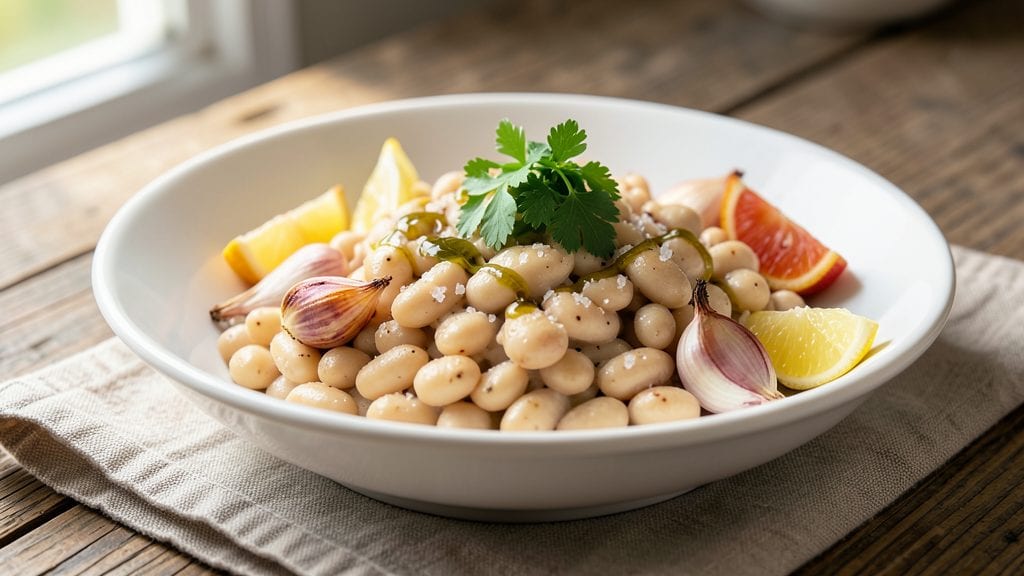
This creamy garlic-herb mash transforms canned white beans into a velvety, plant-based side dish that’s ready in just 15 minutes—perfect for vegan meals or quick weeknight dinners.
The secret lies in blending the beans with garlic, lemon, and fresh herbs until silky smooth, creating a texture that rivals mashed potatoes but stays light and flavorful. I developed this recipe after realizing how versatile canned beans could be when elevated with simple seasonings.
The beauty of this dish is its versatility—serve it as a standalone side, a dip with crusty bread, or a base for hearty bowls. With just five key ingredients, you’ll achieve a creamy, aromatic mash that’s rich enough to satisfy but light enough to balance richer dishes.
The garlic and herbs infuse every bite, while lemon brightens the earthy bean flavor, making it a crowd-pleaser for any meal.
What sets this recipe apart is how quickly it comes together—no soaking, no long cooking times, just 15 minutes of hands-on work for a result that tastes homemade and restaurant-worthy. The blend of garlic, parsley, and lemon creates a fragrant, herby depth that transforms simple canned beans into something extraordinary.
Whether you’re meal prepping or last-minute cooking, this mash delivers creamy, satisfying texture every time.
Use it as a side for grilled vegetables, a base for vegan tacos, or a dip for roasted garlic bread. The possibilities are endless, and the process is foolproof—ideal for beginners and seasoned cooks alike. Let’s get cooking!
Ingredients for canned white beans
Five simple ingredients transform canned white beans into a velvety, restaurant-quality vegan mash.
| Ingredient | Amount | Notes |
|---|---|---|
| Canned White Beans 🥫 | 2 cans | Drained, rinsed, high-quality brand |
| Extra-Virgin Olive Oil 🫒 | ½ cup | High-quality, fruity variety |
| Garlic Cloves 🧄 | 4 cloves | Fresh, peeled, minced finely |
| Fresh Flat-Leaf Parsley 🌿 | ½ cup | Stems removed, chopped finely |
| Fresh Lemon Juice 🍋 | 2 tbsp | Freshly squeezed, strained |
| Sea Salt 🧂 | 1 ½ tsp | Fine grain, Diamond Crystal preferred |
| Black Peppercorns 🌶️ | ½ tsp | Freshly cracked, coarse grind |
| Unsweetened Almond Milk 🥛 | ¼ cup | For creaminess, unsweetened |
| Nutritional Yeast 🍄 | 1 tbsp | For umami depth, optional |
The quality of your white beans matters more than you'd think. Great Northern or Cannellini beans from brands like Bush's or Libby's yield the smoothest texture—avoid the cheaper store brands that often contain additives. Fresh garlic and parsley are non-negotiable here; garden-fresh parsley has more vibrant flavor than the dried stuff. For the olive oil, California Olive Ranch or Colavita brands deliver that perfect fruity punch without overpowering. The almond milk should be unsweetened and refrigerated—Silk or Blue Diamond are reliable choices that won't alter the delicate flavor balance.
No fresh parsley? Fresh cilantro or basil work in a pinch, but reduce to half the amount since they're more potent. Short on almond milk? Unsweetened soy milk or cashew cream maintain the creamy texture, though cashew cream adds richness. The nutritional yeast is optional but adds that cheesy umami depth that makes this mash truly exceptional—Bragg's is the gold standard for this ingredient. For extra creaminess without dairy, blend in 1/4 cup silken tofu with the beans. And if you're using canned beans with skins (like Cannellini), a quick pass through a food mill ensures that velvety texture the intro promises.
This mash keeps beautifully in the fridge for 4-5 days—perfect for meal prep. Store it in an airtight container with a thin layer of olive oil on top to preserve freshness. For longer storage, portion into ice cube trays, freeze, and transfer to a bag. Thaw overnight in the fridge before reheating. The flavor actually improves after the first day as the garlic and lemon infuse deeper. Serve warm alongside grilled vegetables or use cold as a dip with crusty sourdough—the possibilities are endless, just like the intro suggests.
Why You'll Love This Recipe
- Pantry-to-Table Magic: I swear by this one—open the can, toss in garlic and herbs, and boom. No soaking, no waiting, just pure satisfaction in minutes. The beans are already tender, so all you’re doing is dressing them up like a fancy appetizer.
- Bright & Earthy: That lemon juice cuts through the richness of the olive oil, while the parsley adds this fresh, herby punch. Honestly, the flavor is so good it feels like you spent hours simmering, but you didn’t.
- Lunchbox Hero: Pack it cold for work or school—it stays fresh for days. My kids actually eat their veggies when I mix this with diced cucumbers and a sprinkle of feta. (Yes, even on a Tuesday.)
- Budget Win: A single can feeds four, and the rest of the ingredients cost pennies. I’ll be real: I’ve made this for date night, potlucks, and lazy Sundays—no guilt, all flavor.
Step-by-step instructions for creamy garlic-herb white bean mash
Transform simple canned white beans into a velvety, restaurant-worthy mash with this foolproof method.
Prepare the Base Ingredients
Drain and rinse the 2 cans of canned white beans thoroughly under cold water to remove excess starch. This step prevents the mash from becoming gummy. Transfer the beans to a medium saucepan and add the 0.5 cup extra-virgin olive oil. The high-quality olive oil adds richness and helps create that silky texture we're aiming for.
Place the saucepan over medium heat and bring the contents to a gentle simmer. You'll notice the beans begin to soften almost immediately as the oil coats them evenly. Keep the heat at a steady medium—too high and the beans will break down too quickly, losing their structure. Let them cook undisturbed for 5 minutes to allow the oil to fully incorporate and the beans to begin breaking down.
Build the Garlic-Herb Foundation
While the beans simmer, finely mince the 4 cloves garlic cloves and chop the 0.5 cup fresh flat-leaf parsley stems removed. The parsley should be finely chopped to distribute evenly throughout the mash. In a small bowl, combine the minced garlic, chopped parsley, 1.5 teaspoons sea salt, and 0.5 teaspoon freshly cracked black peppercorns.
After the 5 minutes of initial cooking, reduce the heat to low and add the garlic-herb mixture to the beans. Stir gently but thoroughly to combine, allowing the flavors to meld. The garlic should release its aroma almost immediately, filling your kitchen with that unmistakable scent. Cook for another 3 minutes at this low heat, stirring occasionally, until the garlic is fragrant but not browned—this prevents bitterness and maintains the delicate flavor balance.
Create the Creamy Texture
Remove the saucepan from heat and let the mixture cool slightly for 2 minutes. This brief resting period prevents the beans from breaking down further when we add the liquid ingredients. Stir in the 2 tablespoons fresh lemon juice, 0.25 cup unsweetened almond milk, and 1 tablespoon nutritional yeast. The lemon juice brightens the flavors while the almond milk adds creaminess without overpowering the bean taste.
Using an immersion blender or a regular blender, carefully blend the mixture until smooth and creamy. I prefer using an immersion blender right in the saucepan for convenience, but if you use a regular blender, transfer the contents in batches. You want a velvety texture—almost like hummus—with no visible bean chunks. If the mixture is too thick, add 1-2 tablespoons of water or almond milk to reach your desired consistency. The nutritional yeast adds a subtle umami depth that elevates the entire dish.
Refine and Serve
Return the blended mixture to the saucepan and place it over the lowest possible heat setting—just enough to maintain warmth without cooking further. Stir in any additional lemon juice if needed to balance the flavors. Taste and adjust the seasoning with more sea salt or black peppercorns if necessary. The mash should be creamy, flavorful, and properly seasoned with a bright lemon note cutting through the richness.
For the perfect finish, transfer the mash to a serving bowl and let it rest for 5 minutes before serving. This resting period allows the flavors to fully meld and the texture to set slightly. Serve immediately as a side dish, spread on toast, or as a base for dips. The result is a luxurious white bean mash that's surprisingly quick to prepare but feels like a gourmet creation.
Pro Tips For Making Canned White Beans
- Rinse, Then Drain: Open the can and give those beans a quick rinse under cold water—especially if they’re packed in saltwater. You’re not trying to boil them; just a 10-second splash removes that briny edge so the olive oil and lemon shine through. (Yes, even if the label says “ready to eat.”)
- Sauté Garlic Low: After draining the beans, add the olive oil to the pan and let it heat until it’s shimmering but not smoking—then toss in the garlic. If you crank the heat to brown it fast, you’ll end up with bitter, acrid flavor instead of that sweet, nutty aroma. Trust me, the 30-second wait is worth it.
- Mash Some Beans: Use a fork or the back of a spoon to crush about a third of the beans before adding the lemon juice. This releases starch, thickens the sauce slightly, and gives the dish that creamy texture you’d pay extra for in a restaurant. (No food processor needed—keep it rustic.)
- Finish with Zest: Tear the parsley leaves and add them last, but don’t forget to zest half the lemon into the pan before juicing. The bright, citrusy oils cling to the beans and oil, making every bite taste like it was made fresh that morning—not just dumped from a can. (Save the pulp for garnish if you’re feeling fancy.)
Flavor customization for this recipe
Herb Variations
Swap parsley for fresh basil or cilantro to transform this mash into an Italian or Mexican-inspired dish. For basil, use 0.3 cup and add 1 tbsp lemon zest to balance its sweetness.
Cilantro pairs perfectly with ½ tsp ground cumin and ¼ tsp smoked paprika—simmer these spices with the garlic for 1 minute before blending. 🌿
Spicy Kick Options
Add ½ tsp red pepper flakes or 1 tbsp hot sauce (like Cholula) for immediate heat. For smoky depth, stir in ½ tsp smoked salt (like Morton’s) during the final blending step.
I recommend 1 tsp harissa paste for North African-inspired flavor—blend it in with the lemon juice for a complex, spicy-sweet balance.
Umami Boosters
Enhance the savory profile by adding 1 tbsp soy sauce or 1 tsp miso paste (white or red) when blending. For a cheesy note without dairy, mix in 2 tbsp vegan parmesan (like Violife) at the end.
A splash of 1 tbsp white wine (like Sauvignon Blanc) deglazed from the pan adds brightness and complexity.
Sweet & Tangy Twist
Balance the earthy beans with 1 tbsp maple syrup or agave nectar plus 1 tsp apple cider vinegar for a sweet-tangy contrast. This works beautifully with ½ cup diced apple or pear added during the final simmer.
The acidity from the vinegar cuts through the richness, creating a perfect harmony. 🍏
Global Flavors
Transform this into a Moroccan-inspired mash by adding ½ tsp ground coriander, ¼ tsp cinnamon, and 1 tsp tahini during blending. For a Mediterranean twist, fold in ¼ cup crumbled feta (or vegan feta) and 2 tbsp chopped kalamata olives at the end.
These variations keep the creamy texture while introducing bold new flavors.
Nutrition facts
Frequently asked questions
Can I use any type of canned white beans for this recipe?
Great Northern or Cannellini beans work best—they're the creamiest varieties. Avoid beans with skins (like Great Northern) if you want ultra-smooth texture, or use a food mill. The key is high-quality brands like Bush's or Libby's, which have fewer additives that can affect flavor.
How do I make this dish vegan?
This recipe is already 100% plant-based! The almond milk replaces dairy, nutritional yeast adds umami without cheese, and olive oil provides richness. Just ensure all ingredients (like salt and pepper) are vegan-certified. For extra protein, stir in 1/4 cup silken tofu during blending.
What if my mash turns out too thick or too thin?
For thicker texture, blend longer or add 1 tbsp more almond milk. If too thin, simmer uncovered for 2 minutes to reduce. The ideal consistency should be like hummus—creamy but not soupy. A quick fix is to stir in 1 tsp cornstarch mixed with water for instant thickening.
Can I meal prep this ahead of time?
Store in an airtight container for 4-5 days in the fridge. For longer storage, freeze in ice cube trays, then transfer to a bag. Thaw overnight in the fridge—flavors actually improve after the first day as the garlic and lemon infuse deeper. The texture stays creamy when reheated gently.
What are the best ways to serve this mash?
Use it as a side with grilled veggies, spread on toast with chili flakes, or as a dip with crusty bread. For a hearty meal, layer it under roasted vegetables or serve with avocado slices. The creamy texture makes it perfect for vegan tacos or as a base for grain bowls.