
Side Dishes
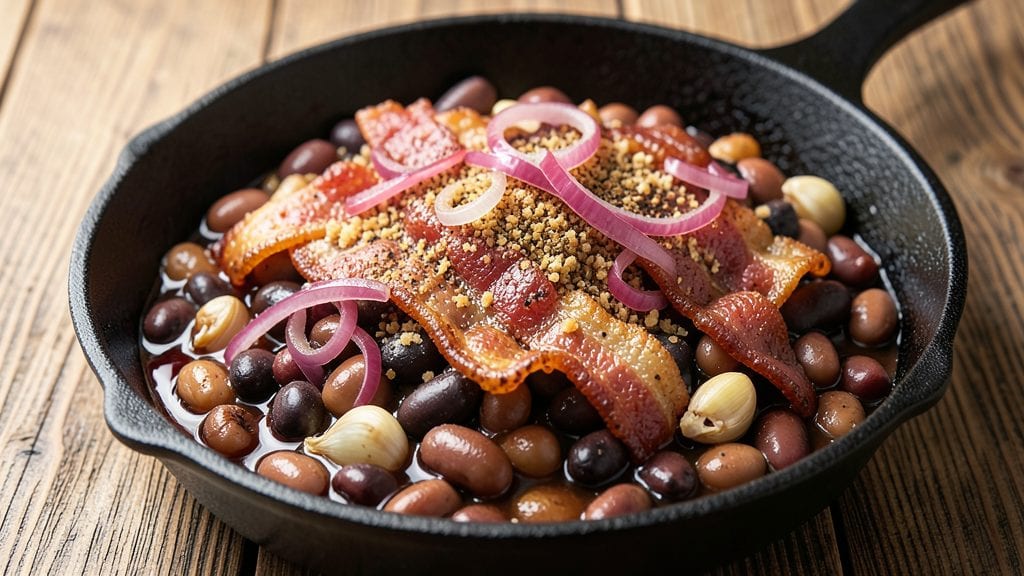
This Dr Pepper baked beans recipe transforms a classic side dish into something unexpectedly bold and complex, where the soda's caramel notes and spicy kick elevate every bite.
The secret lies in balancing the sweet, smoky depth of traditional baked beans with the effervescent tang of Dr Pepper—a swap that creates a sauce so rich it clings to each bean while developing a crispy, caramelized crust on top.
After testing countless variations, I’ve perfected a method that delivers restaurant-quality results without requiring a slow cooker.
The process is simpler than you’d expect, using just a handful of pantry staples and a Dutch oven to build layers of flavor. Dr Pepper replaces the typical brown sugar and molasses, adding a subtle fizz that mellows into a velvety sweetness as it simmers.
Brown sugar still plays a role, but it’s the soda’s hidden spices—like cloves and cinnamon—that give these beans their signature depth. A crispy top forms when you broil the dish at the end, sealing in all that caramelized goodness.
What you’ll end up with is a pot of beans that’s impossibly tender yet holds its shape, coated in a glossy, slightly sticky sauce with just the right balance of sweetness and smoky heat. The crispy crust on top adds texture that contrasts perfectly with the soft beans below.
This isn’t just a side dish—it’s a flavor experience that pairs beautifully with grilled meats or stands alone as a hearty vegetarian meal. Ready to try it?
One of the best things about this recipe is its versatility. Use it as a side for barbecue, serve it at game day gatherings, or even pack it for a picnic—it reheats just as well as it tastes fresh.
The Dr Pepper adds a unique twist that makes these beans unforgettable, proving that sometimes the most unexpected ingredients create the best results.
Ingredients for dr pepper baked beans
Pantry staples meet unexpected soda magic for a side dish that steals the show.
| Ingredient | Amount | Notes |
|---|---|---|
| Navy Beans (Dried) 🌾 | 2 cups | Uncooked, soaked overnight |
| Dr Pepper 🥤 | 1 ½ cups | Chilled, full-carbonated |
| Brown Sugar 🍯 | ½ cup | Packed, light or dark |
| Molasses 🍯 | ¼ cup | Unsulfured preferred |
| Onion (Yellow) 🧅 | 1 whole | Diced, medium size |
| Garlic Cloves 🧄 | 4 cloves | Minced, fresh preferred |
| Ground Mustard 🌶️ | 1 tbsp | Dijon or yellow |
| Ground Cumin 🌿 | 1 tsp | Toasted for depth |
| Ground Cloves 🌶️ | ½ tsp | Freshly ground preferred |
| Ground Cinnamon 🍃 | ½ tsp | Ceylon preferred |
| Black Pepper 🌶️ | ½ tsp | Freshly cracked |
| Salt 🧂 | 1 ½ tsp | Kosher or sea |
| Apple Cider Vinegar 🍏 | 1 tbsp | For tangy balance |
| Unsalted Butter 🧈 | 2 tbsp | Cold, cut into pieces |
| Bacon (Thick-Cut) 🥓 | 6 oz | Chopped, smoked preferred |
The Dr Pepper is the star here—grab a 12-oz can from the soda aisle, not the diet version. The carbonation adds a subtle fizz that mellows into velvety sweetness as it cooks. For the beans, navy beans work best—they hold their shape while soaking up flavor. Soak them overnight in plenty of water (at least 4 cups), then drain. Pro tip: Costco or Trader Joe's often have bulk dried beans at a better price than the grocery store. The bacon? Thick-cut, smoked bacon from the butcher section adds smoky depth—Oscar Mayer or Applewood are solid choices if you're in a hurry.
No Dr Pepper? Root beer or ginger ale work in a pinch, but the caramel notes are key. Short on molasses? Maple syrup at half the amount mimics the depth. The spices are where the magic happens—Penzeys or McCormick for pre-ground cloves and cinnamon, but toast them lightly in a dry pan first for extra punch. Bacon too expensive? Cooked sausage crumbles (Italian or kielbasa) add a similar smoky richness. The butter on top? Full-fat, unsalted—it creates that irresistible crispy crust. Don’t skip the apple cider vinegar; it cuts through the sweetness and enhances the Dr Pepper’s tang.
These beans taste even better the next day—make a double batch if you're feeding a crowd. Store leftovers in an airtight container in the fridge for up to 5 days, or freeze for 3 months. For serving, reheat gently in a skillet to crisp the top again. The crispy crust is non-negotiable—broil for 3-5 minutes at the end if it’s not already golden. Game day? Portion into disposable foil pans for easy transport. The beans reheat beautifully, so they’re perfect for picnics or tailgates too.
Why You'll Love This Recipe
- One-Pot Magic: I swear by this recipe for lazy nights—just toss dried beans, Dr Pepper, and a few pantry staples into one pot, simmer, and forget about it. No fancy prep, no mess, and honestly? The soda does all the heavy lifting for flavor.
- Sweet & Spicy Kick: That caramelized molasses and brown sugar combo? It’s like a hug for your taste buds, but the Dr Pepper’s tang cuts through the sweetness—rich, smoky, and just a little bit funky. My husband licks the spoon when I make it.
- Tailgate Champion: Between us, this is my go-to for game days or backyard BBQs—no one expects fancy beans, but they’ll beg for seconds. Serve it warm with brats or cold in a mason jar for picnics. (Yes, even on a Tuesday night.)
- Budget Stretch: Dried navy beans and soda stretch my grocery budget without sacrificing flavor. A single batch feeds my family for days, and the leftovers? Even better the next day—thick, saucy, and still packed with that addictive Dr Pepper punch.
Step-by-step instructions for Dr Pepper baked beans recipe
This method delivers perfectly tender beans with that signature Dr Pepper sweetness and a crispy, caramelized top.
Prepare the Beans and Cook the Bacon
Begin by draining and rinsing the soaked navy beans thoroughly. In a large Dutch oven, cook the chopped bacon over medium heat until it reaches a deep golden brown and the fat has rendered out completely. This should take about 8-10 minutes. Remove the bacon with a slotted spoon and set it aside on paper towels to drain, reserving 2 tablespoons of the bacon fat in the pot.
Add the diced onion and minced garlic to the pot with the reserved bacon fat. Sauté for 5-6 minutes until the onion becomes translucent and the garlic releases its fragrant aroma. This step develops the foundation of your beans' flavor profile. The onions should soften but not brown—you want them to melt into the beans rather than create a crispy bottom.
Build the Sweet-Spiced Sauce
To the pot with the cooked onions and garlic, add the 0.5 cup brown sugar, 0.25 cup molasses, 1.5 cups Dr Pepper, 1 tablespoon ground mustard, 1 teaspoon ground cumin, 0.5 teaspoon ground cloves, 0.5 teaspoon ground cinnamon, 0.5 teaspoon black pepper, and 1.5 teaspoons salt. Stir everything together until the sugar and spices dissolve completely into the liquid.
Bring this mixture to a gentle boil over medium-high heat, then reduce the heat to medium-low. Let it simmer for 10 minutes to allow the flavors to meld together. You'll notice the mixture thicken slightly as the Dr Pepper loses its fizz and the sugars caramelize. This step is where the magic happens—the sweet, spiced liquid will become the perfect base for your beans.
Combine Beans and Simmer
Add the drained navy beans to the pot and stir gently to coat them evenly with the sweet-spiced liquid. The beans should be completely submerged. If they're not, add ½ cup water to ensure they're covered. Bring the mixture back to a simmer over medium heat, then reduce the heat to low.
Cover the pot and let the beans simmer gently for 1 hour to 1 hour 15 minutes, stirring occasionally. You're looking for beans that are tender but still hold their shape. The mixture should thicken as the beans absorb the liquid. If it gets too thick and the beans aren't tender, add ¼ cup water to maintain the proper consistency. This slow cooking process is crucial—it allows the beans to absorb all the sweet, smoky flavors.
Add Butter and Top for Crispy Finish
Once the beans are tender, stir in the 2 tablespoons cold unsalted butter and 1 tablespoon apple cider vinegar. The butter will add richness, while the vinegar provides a bright, tangy contrast to the sweetness. Return the reserved bacon to the pot and stir to distribute it evenly throughout the beans.
Transfer the bean mixture to a 9x13-inch baking dish. Cover the dish with aluminum foil and bake at 350°F for 30 minutes. After this initial baking time, uncover the dish and increase the oven temperature to 400°F. Bake for an additional 15-20 minutes until the top develops a deep golden brown color and forms a crispy crust. This crispy top is what sets these baked beans apart—it adds texture and visual appeal.
Rest and Serve
Remove the baking dish from the oven and let the beans rest for 10 minutes before serving. This resting period allows the flavors to settle and the crispy top to set. The beans should be hot and bubbling with that perfect balance of sweet, smoky, and tangy flavors.
Serve the Dr Pepper baked beans immediately, topped with any additional crispy bacon bits if desired. Each bite should deliver tender beans with a crispy exterior, sweet and spiced with the unique flavor of Dr Pepper. These beans pair beautifully with grilled meats, cornbread, or even as a standalone dish with a side of pickles for contrast.
Pro Tips For Making Dr Pepper Baked Beans
- Soak Beans Overnight: I learned this the hard way—rushing the soak means tough, mealy beans. Dried navies need at least 8 hours in water (or quick-soak with boiling water for 2 hours), then drain and rinse. The longer they soak, the creamier your finished sauce will be.
- Sweat Onions Low: After burning three batches, I finally figured out: onions need gentle heat. Cook them in the Dutch oven with a splash of Dr Pepper (yes, even at this stage) until soft but not browned—about 10 minutes. Brown sugar caramelizes fast, and you’ll end up with a bitter mess if you’re not careful.
- Reduce Dr Pepper First: Sounds weird, but it works: simmer the Dr Pepper alone for 5 minutes before adding other ingredients. This cuts the acidity and intensifies the caramelized flavor. Skip this, and your beans might taste flat or overly fizzy.
- Stir Brown Sugar Early: My grandmother swore by this, and she was right: fold in the brown sugar before the molasses. It dissolves faster and prevents clumps that turn into weird, grainy bits. A quick whisk with a splash of water helps if it’s stubborn.
Essential equipment for great dr pepper baked beans
Dutch Oven Essentials
Your Dutch oven is the workhorse of this recipe—it’s the only pot that can handle the slow simmering and crispy finish without burning. I swear by a Lodge 5.5-quart Dutch oven for its even heat distribution and durable enameled surface.
If you don’t own one, a heavy-bottomed stainless steel pot (like All-Clad) works too, but watch for hot spots. The deep sides prevent spills when adding the Dr Pepper, and the tight lid traps steam for tender beans. 🔥
Broiler for Crispy Top
For that golden, crackling crust, you’ll need a broiler—no oven will do the job as well. Position the oven rack 4-5 inches from the heating element to get a direct, intense heat. If your broiler isn’t strong enough, finish under the highest oven setting (500°F) for 5-10 minutes.
A baking sheet on the lower rack catches drips, keeping your oven clean. Pro tip: Spray the baking dish with nonstick spray before transferring beans to prevent sticking.
Measuring Tools
Precision matters when balancing sweet, smoky, and tangy flavors. Use a stainless steel measuring cup for the Dr Pepper and molasses—glass can be tricky with carbonated liquids. A digital kitchen scale ensures accurate measurements for spices like cloves and cinnamon (I weigh mine to 0.1 grams for consistency).
For the brown sugar, pack it firmly into the measuring cup to avoid under-measuring. A fine-mesh strainer helps drain soaked beans thoroughly, preventing a watery sauce. 💡
Bacon Cooking Setup
Cooking bacon in the same pot as your beans saves cleanup and infuses smoky flavor. Use a wire rack over a baking sheet to drain bacon fat—it prevents soggy beans later. A slotted spoon makes it easy to remove bacon while leaving fat behind.
For extra crispiness, pat bacon dry with paper towels before cooking. If you’re short on time, microwave bacon (yes, really!) for 1 minute to render fat, then finish in the Dutch oven. 🥓
Thermometer for Perfect Doneness
A meat thermometer isn’t just for meat—it’s your secret weapon for beans. Insert it into the thickest bean and aim for 205°F internal temperature (they’ll soften slightly after resting). Without one, test by mashing a bean gently—it should break down but still hold shape.
For the broiler step, monitor closely after 10 minutes to avoid burning. A laser thermometer (like ThermoWorks) lets you check temp without opening the oven. 🌡️
Storage Containers
Leftovers deserve proper storage. Use glass Pyrex or ceramic dishes with tight-sealing lids to preserve the crispy top. For freezing, quart-sized freezer bags (lay them flat to save space) work best. Label with the date—these beans keep for 3 months in the freezer.
When reheating, cover with a damp paper towel and microwave on 50% power to revive the crispiness. A small saucepan is better for stovetop reheating—add 1-2 tablespoons water to prevent drying. ❄️
Nutrition facts
Frequently asked questions
Can I use canned beans instead of dried?
For a quicker version, use 2 (15-oz) cans of navy or great northern beans, drained and rinsed. Skip the overnight soak and reduce the simmering time to 45-60 minutes—they’ll absorb the flavors just as well. Just be sure to add ½ cup water if the mixture seems too thick, since canned beans have less natural moisture.
What if I don't have Dr Pepper?
Try these substitutes: 1 cup root beer (for caramel notes) or 1 cup ginger ale (for tang). For a non-carbonated option, mix ½ cup molasses + ½ cup apple cider vinegar + ½ cup water. Avoid diet sodas—the artificial sweeteners can make the beans taste off. The key is balancing sweetness with acidity to mimic Dr Pepper’s depth.
Why did my beans turn out watery?
Watery beans usually mean one of two things: either the beans weren’t drained well after soaking (use a fine-mesh strainer), or you didn’t simmer long enough for the liquid to reduce. Always simmer uncovered for the last 15 minutes to thicken the sauce. If it’s still too thin, transfer to a skillet and cook on medium-high heat for 5-10 minutes to evaporate excess liquid.
Can I make these in a slow cooker?
Yes! Follow the same steps until adding the beans, then transfer everything to a 6-quart slow cooker. Cook on LOW for 6-7 hours or HIGH for 3-4 hours. For the crispy top, transfer to a baking dish and broil for 10-15 minutes at the end. The slow cooker method is perfect for hands-off prep, especially for large gatherings.
How do I reheat leftovers without losing the crispy top?
Reheat in a skillet over medium heat for 5-7 minutes, stirring occasionally, until hot. For oven reheating, cover with foil and bake at 350°F for 20 minutes, then uncover and broil for 2-3 minutes to restore crispiness. Microwave reheating works too—cover with a damp paper towel and heat on 50% power for 1-2 minutes, then finish under the broiler for 1 minute.