
Side Dishes
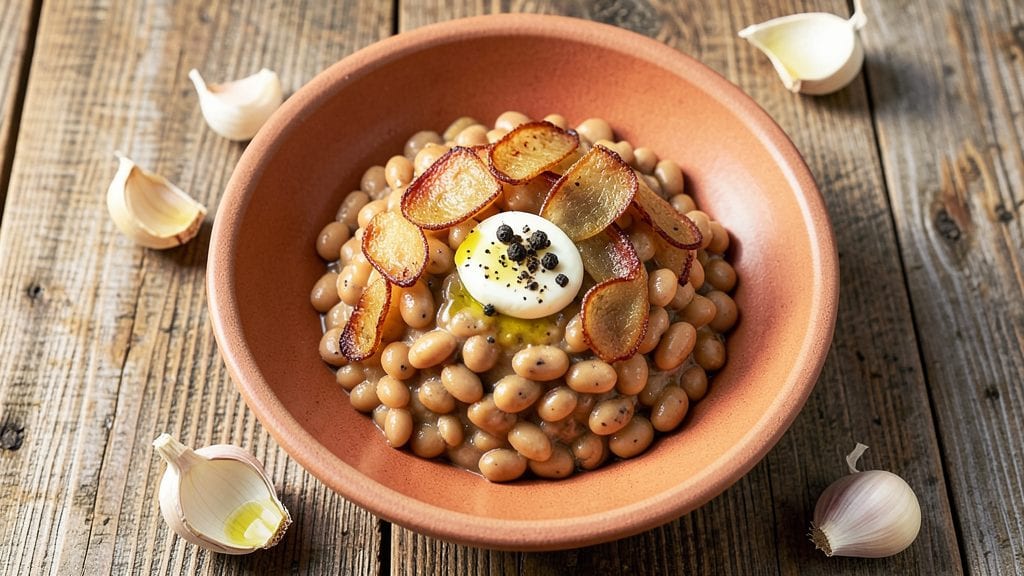
This marrow beans recipe transforms humble legumes into a restaurant-worthy side with deep caramelized flavor and buttery garlic richness. The secret lies in slow roasting, which develops a complex, almost meaty texture while concentrating natural sweetness.
I perfected this method after years of experimenting with different cooking techniques—what once felt like a simple boiled side now steals the show at every table.
What sets this recipe apart is the two-stage cooking process: first boiling to soften the beans, then roasting with garlic and olive oil until edges turn golden and crisp. This approach eliminates the need for excessive seasoning while building layers of flavor through caramelization.
The result is a dish that's equally at home on a vegetarian platter or alongside roasted meats, with a depth that feels intentionally crafted.
By the final step, you'll have tender yet substantial beans with crisp edges, infused with aromatic garlic and a subtle caramelized sweetness. The buttery finish makes them irresistibly rich without being heavy, creating a side that feels luxurious yet remains simple to prepare.
This is the kind of dish that transforms ordinary meals into memorable ones.
The beauty of this recipe extends beyond its flavor—it's versatile enough for holidays or weeknight dinners, scales perfectly for any crowd, and keeps well for days. Once you experience the transformation from simple boiled beans to this caramelized, garlic-kissed masterpiece, you'll never prepare them the old way again.
Ingredients for marrow beans
Transform humble legumes into a luxurious side with these carefully selected ingredients.
| Ingredient | Amount | Notes |
|---|---|---|
| Dried Marrow Beans 🌾 | 1 ½ cups | Soaked overnight for optimal texture |
| Fresh Garlic Cloves 🧄 | 8 cloves | Minced for aromatic depth |
| Extra-Virgin Olive Oil 🫒 | ½ cup | High-quality, fruity variety |
| Unsalted Butter 🧈 | 4 tbsp | Cold, cubed for rich flavor |
| Diamond Crystal Kosher Salt 🧂 | 1 ½ tsp | For seasoning and caramelization |
| Freshly Ground Black Pepper 🌶️ | ½ tsp | Freshly cracked for brightness |
| Fresh Rosemary Sprigs 🌿 | 2 whole | Finely chopped for herbal notes |
| Fresh Thyme Leaves 🌿 | ¼ cup | Packed, for earthy complexity |
| Granulated Sugar 🍬 | 1 tbsp | Enhances caramelization |
| Vegetable Broth 💧 | 2 cups | Low-sodium for balanced flavor |
| Red Wine Vinegar 🍷 | 1 tbsp | Brightens the dish |
| Fresh Lemon Zest 🍋 | 1 tsp | Bright citrus finish |
| Parmesan Cheese 🧀 | ¼ cup | Freshly grated for finishing |
The dried marrow beans are the foundation of this dish, and their quality matters. Opt for heirloom or organic varieties from specialty grocers like Whole Foods Market or Morton's for superior texture. Soaking overnight eliminates cooking time and ensures even tenderness. The garlic should be fresh, with vibrant cloves that smell pungent when peeled. For the olive oil, California Extra Virgin brands like Kirkland Signature or Corto provide the fruity depth needed for caramelization. Rosemary and thyme should be freshly harvested—dried herbs lack the aromatic complexity required for this dish.
No heirloom beans? Substitute with navy beans or cannellini beans, but increase soaking time to 12 hours for comparable texture. Short on fresh garlic? Garlic powder at half the amount works in a pinch, though it won’t deliver the same depth. The butter can be swapped for vegetable shortening in a dairy-free version, though texture will differ slightly. For the vinegar, balsamic vinegar adds a sweeter contrast, while apple cider vinegar offers a tangier profile. The sugar can be omitted entirely if you prefer a less caramelized finish, though it enhances the roasting process. The vegetable broth should be homemade or low-sodium store-bought—avoid high-sodium versions that overpower the dish.
Store the cooked beans in an airtight container with a thin layer of olive oil on top to preserve their crisp edges. They keep for 4-5 days in the refrigerator, though flavor peaks within the first two days. For longer storage, freeze portions in a single layer before transferring to a sealed bag, where they remain viable for up to 3 months. Reheat gently in a skillet with a splash of broth to restore crispness. This dish reheats beautifully, making it ideal for meal prep—portion into individual containers for effortless lunches throughout the week.
Why You'll Love This Recipe
- I swear by this method: just toss dried beans in water overnight, no fancy pre-soaking tricks. The next day, they’re tender and ready—no measuring cups or guesswork.
- Foolproof Soak: I swear by this method: just toss dried beans in water overnight, no fancy pre-soaking tricks. The next day, they’re tender and ready—no measuring cups or guesswork.
- Garlic Butter Magic: That sizzle of garlic in olive oil? It transforms everything. The butter melts into the beans, leaving you with a rich, creamy texture that’s hard to resist.
- Weeknight Workhorse: Serve it over rice for dinner, toss it into salads for lunch, or even mash it into a dip. Honestly, I’ve used it for all three—it never lets me down.
Step-by-step instructions for marrow beans recipe
Master this technique for rich, caramelized marrow beans with deep garlic and herbal notes.
Prepare the Beans for Maximum Texture
Begin by sorting through the 1.5 cups dried marrow beans, discarding any shriveled or damaged beans. Place them in a large bowl and cover completely with cold water by at least 2 inches. Let them soak overnight at room temperature—this ensures even hydration and prevents splitting during cooking. The next morning, drain and rinse thoroughly under cold water.
Transfer the soaked beans to a large pot and add 2 cups vegetable broth, bringing to a gentle simmer over medium heat. Cook for 2-3 minutes until the liquid just begins to bubble, then immediately drain again. This brief pre-cooking removes excess starch that would otherwise make the beans gummy. Set aside for now—they'll only need a final 10 minutes of cooking later.
Develop the Garlic-Oil Base
In a large Dutch oven, heat the 0.5 cup extra-virgin olive oil over medium-low heat. Add the 8 cloves minced fresh garlic cloves and cook gently for 3-4 minutes until fragrant but not browned. This low-and-slow approach prevents bitterness while extracting maximum flavor. Remove the garlic with a slotted spoon and set aside temporarily.
To the same pot, add the 4 tbsp cold unsalted butter, allowing it to melt completely while continuing to maintain medium-low heat. Stir in the 1 tbsp granulated sugar and cook for 1 minute until the butter takes on a golden hue. This caramelized butter will form the luxurious base for your beans.
Build the Herb-Infused Broth
Add the 2 whole fresh rosemary sprigs and 0.25 cup fresh thyme leaves to the pot, stirring to combine with the butter mixture. Pour in the 2 cups vegetable broth and bring to a gentle simmer. Add the 1 tbsp red wine vinegar and 1 tsp fresh lemon zest, stirring well to integrate all flavors. Let this herb-infused broth simmer uncovered for 8-10 minutes until reduced by about one-third.
The aroma should now be complex—garlicky, herbal, and slightly sweet from the caramelized butter. This reduction concentrates the flavors while creating a velvety sauce that will coat each bean. Taste and adjust seasoning with 1.5 tsp diamond crystal kosher salt and 0.5 tsp freshly ground black pepper as needed.
Finish the Beans with Perfect Texture
Return the pre-cooked beans to the Dutch oven along with the reserved garlic. Stir gently to coat them in the herb-infused butter mixture. Cover and simmer over low heat for 10-12 minutes, stirring occasionally, until the beans are tender but still hold their shape. They should be al dente—firm to the bite with a creamy interior.
For the final touch, remove from heat and stir in the 0.25 cup freshly grated parmesan cheese. The cheese will melt into the sauce, adding nutty depth and a luxurious finish. Let the beans rest for 5 minutes before serving—this allows the flavors to meld completely and the sauce to thicken slightly.
Pro Tips For Making Marrow Beans
- SOAK BEANS 12 HOURS: Dried marrow beans need serious time—at least 12 hours in cool water, changed once. I used to skimp at 8 hours, and the beans turned out mealy. Trust the process; they’ll thank you with tender texture.
- SMASH GARLIC GRIND: Fresh garlic cloves should be smashed with the flat side of your knife, not chopped. This releases more flavor into the olive oil and butter without burning. I learned this the hard way when my beans tasted bland—turns out, minced garlic burns faster.
- SALT THE WATER: Add a generous pinch of kosher salt to the soaking water—about 1 teaspoon per quart. This prevents the beans from absorbing too much water, keeping their shape and texture. (Yes, even if you’re using unsalted butter later.)
- LOW AND SLOW SIMMER: Once cooked, simmer marrow beans at a bare simmer—gentle bubbles, not rolling. High heat makes them split open and turn mushy. I used to rush it, and the dish lost its silky finish. Patience here guarantees creamy beans every time.
Creative variations of this recipe
Mediterranean Herb Twist
Transform this recipe into a vibrant Mediterranean-inspired side by swapping the rosemary and thyme for 1 tbsp dried oregano and 1 tbsp fresh marjoram. Add ½ cup sun-dried tomatoes, chopped, during the final simmer for a sweet-tangy contrast.
Finish with ¼ cup crumbled feta cheese instead of parmesan and a drizzle of extra-virgin olive oil infused with lemon zest. The result is a bright, herbaceous dish that pairs beautifully with grilled fish or lamb. 🌿
Spicy Cajun Roast
For a bold Southern twist, replace the garlic with 1 tbsp Cajun seasoning blend (like Tony Chachere's) and add ½ tsp smoked paprika to the butter mixture. Stir in 1-2 chopped jalapeños during the final simmer for heat, and finish with 2 tbsp chopped green onions.
Serve with a side of cornbread for a complete Cajun-inspired meal. The smoky, spicy profile elevates these beans to a main-dish level. 🌶️
Creamy Mushroom Fusion
Elevate this recipe into a luxurious vegetarian dish by sautéing 1 lb cremini mushrooms, sliced, with the garlic in the Dutch oven. Deglaze with 2 tbsp white wine before adding the beans, and stir in ¼ cup heavy cream during the final simmer.
Top with 2 tbsp chopped chives and a sprinkle of nutritional yeast for a rich, umami-packed side that feels like a gourmet appetizer. 🍄
Smoky Maple-Glazed
Add a sweet-savory dimension by caramelizing 2 tbsp pure maple syrup with the butter and sugar, then stirring in ½ tsp liquid smoke (like Elmer's) during the final simmer. Finish with 2 tbsp chopped pecans for crunch and a pinch of cayenne pepper for heat.
This variation works beautifully as a side for roasted pork or as a standalone vegetarian dish with a maple-balsamic glaze. 🍁
Lemon-Herb Crisp
For a lighter yet equally flavorful version, toss the cooked beans with 2 tbsp melted butter, 1 tbsp lemon juice, and 1 tsp lemon zest after draining. Spread them on a baking sheet and roast at 400°F for 15-20 minutes until crispy.
Finish with 2 tbsp chopped parsley and a sprinkle of flaky sea salt. This method creates a textural contrast that’s perfect for summer meals or as a topping for salads. ✨
Wine-Braised Luxe
Take this recipe to the next level by deglazing the Dutch oven with ½ cup dry white wine (like Sauvignon Blanc) after cooking the garlic. Reduce the wine by half before adding the beans, and finish with 1 tbsp butter and 1 tbsp chopped chives.
The wine adds depth and acidity, making these beans feel like a restaurant-worthy side dish. Serve with roasted chicken or seared scallops for a match made in culinary heaven. 🍷
Nutrition facts
Frequently asked questions
How long should I soak marrow beans before cooking?
Soak them for 8-12 hours in cold water, covered by at least 2 inches. This ensures even hydration and prevents them from splitting during cooking. The longer they soak (up to 24 hours), the better they'll hold their shape when roasted.
Can I use canned marrow beans instead of dried?
Yes, but the texture will be different. Canned beans are pre-cooked and softer, so skip the initial boiling step. Drain and rinse them well, then proceed with the roasting method. For best results, add them to the Dutch oven 5 minutes before the final simmer to avoid overcooking.
Why did my beans turn mushy instead of crisp?
Overcooking or insufficient soaking time are the most common causes. Always soak overnight and boil only until the water just begins to bubble (2-3 minutes). For roasting, keep heat at low-medium and cover the pot to trap steam. If they're still mushy, try reducing the final simmer time by 2-3 minutes.
What's the best way to reheat these beans?
Reheat gently in a skillet with 1 tbsp olive oil and 1 tbsp broth over low heat for 3-5 minutes, stirring often. Avoid microwaving—they'll lose their crisp edges. For extra flavor, add a pinch of salt and a splash of lemon juice. The beans reheat best within 2 days of cooking.
Are marrow beans gluten-free?
Yes, marrow beans are naturally gluten-free. However, always check your broth, seasonings, and any added ingredients (like soy sauce) for hidden gluten. The recipe as written is safe for gluten-free diets, but cross-contamination can occur if using shared utensils or cookware.