
Side Dishes
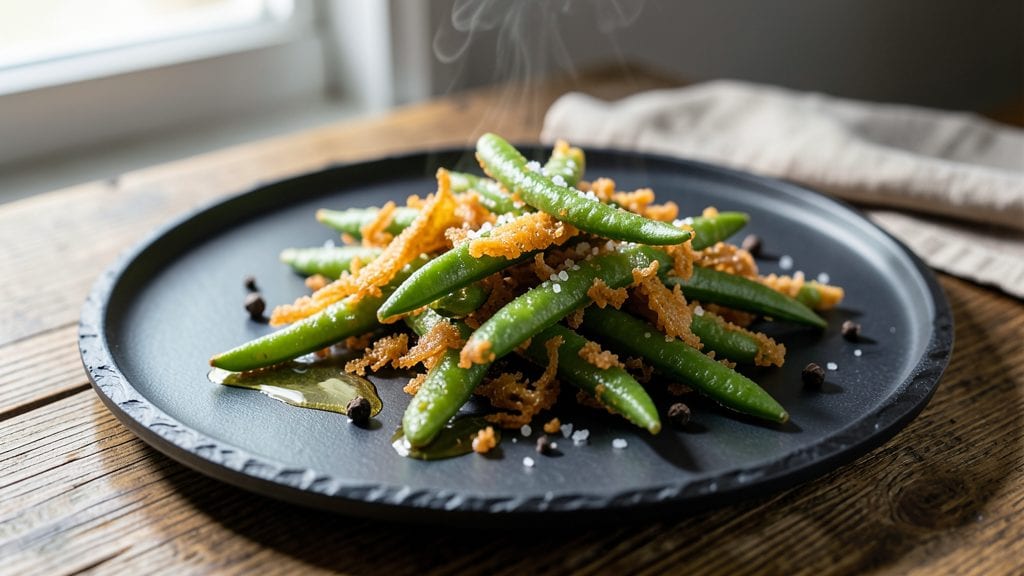
This tempura green beans recipe delivers the perfect crispy-golden crunch that makes every bite irresistible. The secret lies in the ultra-light batter and precise frying technique—something I perfected after years of trial and error.
What sets this method apart is how the batter clings just enough to create that signature shatteringly crisp exterior while keeping the beans tender inside.
Unlike traditional tempura recipes that require specialized equipment, this version uses simple ingredients you likely already have: all-purpose flour, ice-cold water, and cornstarch for that extra crunch.
The key is maintaining the batter's ice-cold temperature throughout the process—this prevents gluten development, ensuring your green beans stay light and crispy rather than dense. Frying at the right temperature (around 350°F) is non-negotiable for achieving that golden perfection.
Once you pull them from the oil, the transformation is immediate—green beans that were once limp become crispy golden rods with just a hint of chew. The best part? They stay crispy even after sitting for a few minutes, unlike many fried vegetables that turn soggy.
Serve them with a side of ponzu or soy dipping sauce for that authentic Japanese restaurant experience at home.
This technique works equally well with other vegetables like asparagus or zucchini, making it incredibly versatile. Whether you're hosting a dinner party or simply craving a restaurant-quality side dish, these tempura green beans will elevate any meal. Let's get started on creating that perfect crunch.
Ingredients for tempura green beans
Nine simple ingredients transform limp green beans into crispy-golden tempura perfection in minutes.
| Ingredient | Amount | Notes |
|---|---|---|
| Fresh Green Beans 🥦 | 1 ½ lb | Trimmed, cut into 3-inch pieces |
| All-Purpose Flour 🌾 | 1 cup | Sifted for lightness, ice-cold |
| Cornstarch 🌾 | ½ cup | For extra crispiness |
| Ice-Cold Water 💧 | 1 ½ cups | Freshly chilled, not tap |
| Diamond Crystal Kosher Salt 🧂 | 1 tsp | For batter seasoning |
| Vegetable Oil 🫒 | 3 cups | High smoke point (350°F) |
| Fresh Lemon Juice 🍋 | 1 tbsp | Brightens flavor post-fry |
| Ponzu Sauce 🍶 | ¼ cup | For dipping, optional |
| Unsalted Butter 🧈 | 2 tbsp | Melted for finishing |
The green beans are the star—look for bright green, straight pods with no blemishes. Trader Joe's or Whole Foods carry the best quality, but any fresh market will do. Trim the ends and cut into 3-inch lengths for even cooking. The batter's secret? Keeping everything ice-cold. Freeze your water overnight if you're really serious about that restaurant-quality crunch. For the flour, King Arthur or Bob's Red Mill brands work best—they're finely milled and create a lighter batter. Don't skip the cornstarch; it's what gives those beans that signature shatteringly crisp texture.
No Diamond Crystal salt? Morton kosher salt works, but measure carefully—it's denser. Running short on vegetable oil? Peanut or canola oil both work, but keep the temp at 350°F—any hotter and they'll burn. The ponzu sauce can be swapped for soy sauce with lemon juice, but trust me, the real stuff makes all the difference. For a gluten-free version, use rice flour instead of all-purpose, but add an extra tablespoon of cornstarch to compensate. And if you're feeling fancy, try a pinch of white pepper in the batter for that authentic Japanese touch.
These stay crispy for about 10 minutes if you keep them warm in a 200°F oven on a wire rack. For longer storage, let them cool completely, then freeze between parchment paper for up to 1 month. Reheat in a 375°F oven for 5-7 minutes to restore that golden crunch. Pro tip: Serve immediately after frying with the melted butter drizzled over top—it's like a little flavor upgrade that takes everything to the next level. And save those leftover beans? Toss them into a salad the next day—they add a delightful crunchy contrast.
Why You'll Love This Recipe
- Crisp in Minutes: I swear by the ice-cold water trick—those beans hit the oil perfectly golden in under 10 minutes. No waiting for dough to rise or sauces to simmer.
- Addictive Crunch: That flour-cornstarch mix? It’s the secret—light, airy batter with a shatter of crunch that disappears too fast. (Yes, I’ve eaten them straight from the pan.)
- Party-Ready Side: Bring these to potlucks or serve them at holiday tables—they’re fancy enough to impress but take zero effort. (Pro tip: Double the batch; they vanish.)
- Budget Crunch: Fresh green beans stretch to feed four for under $5, and the batter costs pennies. Leftovers? Reheat in the oven until crispy again—no soggy seconds here.
Step-by-step instructions for crispy-golden tempura green beans
Here's how to achieve that perfect tempura texture—light, airy batter with a shatteringly crisp exterior.
Prepare the Green Beans for Frying
Trim the ends from the 1.5 lb fresh green beans and cut them into 3-inch pieces, discarding any woody stems. The key to perfect tempura is using completely dry vegetables—pat each piece thoroughly with paper towels to remove all moisture. Any lingering water will prevent the batter from adhering properly and result in greasy, soggy beans instead of crispy ones.
Spread the trimmed beans on a clean kitchen towel and let them air-dry for 5 minutes while you prepare the batter. This extra step makes all the difference in achieving that signature tempura crunch. Work quickly but carefully—green beans cook faster than you might expect once they hit the hot oil.
Make the Light-as-Air Tempura Batter
In a medium bowl, whisk together the 1 cup all-purpose flour and 0.5 cup cornstarch until completely combined—no lumps allowed. This ratio creates that signature tempura texture: crisp on the outside, tender inside. Gradually whisk in the 1.5 cups ice-cold water until smooth, then add the 1 tsp diamond crystal kosher salt and mix once more.
The batter should be thin enough to coat the back of a spoon but thick enough to cling to the beans. Here's the crucial part: let the batter rest for 10 minutes at room temperature. This resting period allows the starches to fully hydrate, creating a lighter, more stable batter that won't weigh down your green beans. Don't skip this step—it's what separates good tempura from exceptional tempura.
Heat the Oil to Precision Temperature
Pour the 3 cups vegetable oil into a deep, heavy-bottomed pot or Dutch oven and heat to 350°F using a deep-fry thermometer for accuracy. This temperature is critical—too low and your beans will absorb oil; too high and they'll burn before cooking through. The oil should shimmer gently when properly heated, but not smoke excessively.
While the oil heats, have a wire rack ready over a baking sheet lined with paper towels. The rack allows air to circulate underneath, preventing soggy bottoms. Keep the beans within easy reach of the fryer—you'll want to work quickly once they're coated. The oil temperature will drop slightly when you add the beans, so maintain vigilance.
Fry the Green Beans to Golden Perfection
Working in batches of no more than ½ cup beans at a time, dip each piece into the rested batter, letting any excess drip off. Carefully lower them into the 350°F oil using a slotted spoon or spider skimmer, being gentle to avoid splattering. Fry for 2-3 minutes until they turn a deep golden brown—this is your visual cue that they're perfectly crispy.
Use tongs to transfer the fried beans to the prepared wire rack and immediately sprinkle with a pinch of salt. The beans will continue cooking on the rack, so don't let them pile up or they'll steam instead of staying crisp. Work in batches to maintain the oil temperature—dropping below 340°F will compromise your crispiness. You should be able to hear a satisfying crackle as they cook.
Finish with Lemon and Ponzu for Maximum Flavor
Once all the beans are fried and golden, transfer them to a serving platter. Drizzle with 1 tbsp fresh lemon juice and toss gently to brighten the flavors and prevent the beans from becoming greasy. Melt the 2 tbsp unsalted butter in a small saucepan over low heat, then pour it over the beans and toss again to distribute evenly.
For serving, arrange the beans on a platter and drizzle with the 0.25 cup ponzu sauce on the side for dipping. The combination of tangy ponzu, bright lemon, and rich butter creates a flavor profile that elevates these simple green beans from side dish to star. Serve immediately while still crisp—tempura loses its texture as it cools. Each bite should deliver that perfect contrast of crispy exterior and tender interior with vibrant citrus notes.
Pro Tips For Making Tempura Green Beans
- TRIM BEANS LIKE A PRO: Fresh green beans need a clean cut—blunt scissors or a knife too close to the stem leaves behind a messy, uneven bite. Use a sharp knife and cut them into 2.5-inch pieces, leaving about 1/4 inch of stem attached. (Yes, even if you’re impatient like me, this step makes a real difference.)
- CHILL THE BATTER SLIGHTLY: Your batter mix should be ice-cold, but don’t just dump frozen water in—let it sit in the fridge for 10 minutes after mixing. This keeps the coating crispy instead of gummy, especially when frying in batches. (I learned this the hard way after soggy third tries.)
- FRY IN SMALL BATCHES: Overcrowding the oil lowers its temperature, and tempura green beans need a screaming-hot fry to stay crisp. Work in batches of 4-5 beans at a time, giving them space to sizzle without steaming. (Your future self will thank you when they’re golden, not limp.)
- SALT THE BEANS FIRST: Toss the trimmed green beans with 1 teaspoon of kosher salt (Diamond Crystal) and let them sit for 10 minutes before drying. This draws out moisture, ensuring a better crust and preventing splatter when frying. (Sounds weird, but it works—trust the process.)
Storing and reheating this dish
Refrigerator Storage
Tempura green beans stay fresh in the fridge for up to 3 days if stored properly. Let them cool completely first, then transfer to an airtight container lined with paper towels to absorb excess moisture. Store them in a single layer to prevent sticking—never stack.
The key is keeping them completely dry; any condensation will turn them soggy. I like using glass containers with snap-on lids from Pyrex because they seal tightly and don’t absorb odors. 🥦
Freezer Preservation
For longer storage, freeze your tempura green beans for up to 1 month. First, arrange them in a single layer on a baking sheet lined with parchment paper and freeze until solid. Then transfer to freezer bags (remove as much air as possible) or airtight containers.
When ready to eat, thaw in the fridge overnight, then reheat in a 375°F oven for 5-7 minutes on a wire rack to restore crispiness. Avoid microwaving—it’ll make them rubbery. ❄️
Oven Reheating
The best way to revive tempura texture is with the broiler method. Preheat your oven to 375°F, place beans on a wire rack set over a baking sheet, and broil for 3-4 minutes until golden again. This method mimics the original frying process, giving you that satisfying crunch.
For extra flavor, brush with a tiny bit of melted butter before reheating. If they lose crispiness too quickly, store them in the freezer instead of the fridge. 🔥
Microwave Workaround
If you’re in a rush, the microwave can work—but expect slightly less crunch. Place beans on a microwave-safe plate with a damp paper towel over them (not touching), then heat on high for 20-30 seconds.
The steam helps revive texture, but it won’t match oven-reheated results. For best flavor, finish with a squeeze of lemon juice and a sprinkle of flaky sea salt after reheating. 💫
Serving Leftovers
Tempura green beans make amazing next-day salads or grain bowls. Toss with warm quinoa, cherry tomatoes, and a drizzle of balsamic glaze for a cold dish with texture contrast. For a warm option, serve over steamed jasmine rice with a side of miso soup.
The crispy beans add a delightful crunch that balances soft textures perfectly. Save the ponzu sauce for fresh batches—it loses its tang when reheated. 🌟
Nutrition facts
Frequently asked questions
Can I use frozen green beans for this tempura recipe?
Fresh green beans are ideal for tempura because they hold their shape better and absorb the batter more evenly. However, if you must use frozen, thaw them completely first and pat them extra dry with paper towels—water is the enemy of crispy tempura. For best results, use high-quality frozen beans with no ice crystals or steam burns.
Why did my tempura green beans turn out greasy instead of crispy?
Greasy tempura usually means one of three things: oil temperature was too low (350°F is critical), the beans weren't dry enough before battering, or you overcrowded the fryer. Always work in batches of ½ cup or less and maintain the oil temperature—dropping below 340°F will make them absorb oil instead of crisping.
Can I make the batter ahead of time?
No, the batter must be made fresh and kept ice-cold until use. The cornstarch and flour need to be combined with ice-cold water just before frying to prevent gluten formation, which would make your tempura dense instead of light. If you're prepping ahead, chill your ingredients separately and mix them right before cooking.
What other vegetables pair well with tempura batter?
This same batter works beautifully with asparagus, zucchini, shishito peppers, or even shrimp for a seafood twist. Just adjust cooking times—thin vegetables like shishito peppers cook in 1 minute, while denser veggies like zucchini need 2-3 minutes. The key is always thorough drying before battering.
How do I keep tempura green beans crispy when serving?
Serve immediately after frying on a wire rack (not a plate) to allow air circulation. If you need to hold them briefly, keep in a 200°F oven for up to 10 minutes. For parties, fry in batches and reheat in the oven before serving—never microwave, as it destroys the crispiness.