
Side Dishes
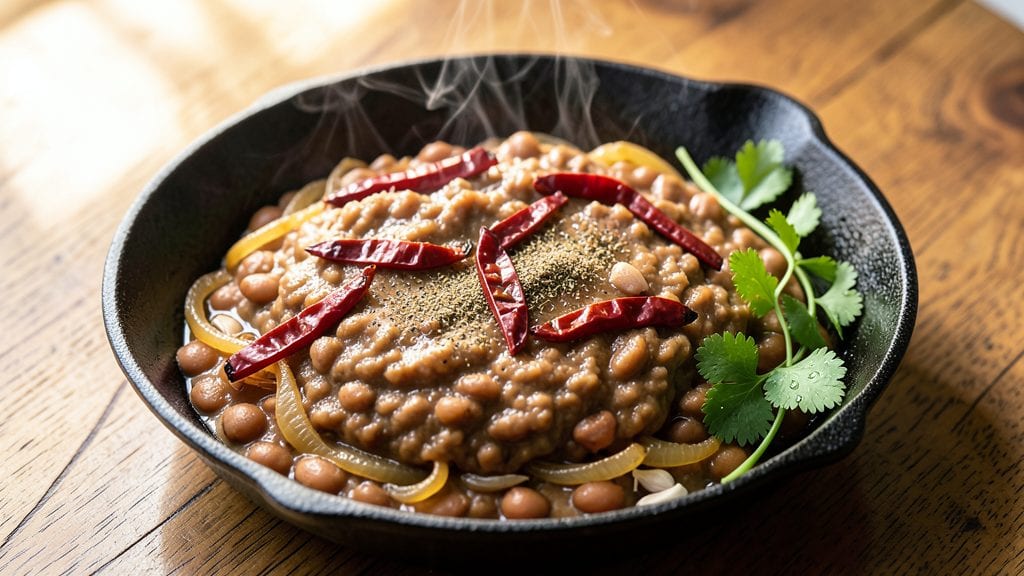
This traditional Mexican refried beans recipe delivers the rich, smoky creaminess that makes it a staple at every Mexican table—where it transforms simple beans into a velvety, flavor-packed side dish.
The secret lies in slow-cooking dried beans until tender, then frying them in lard (or vegan butter) until they develop that signature buttery texture. I’ve perfected this method over years of testing, ensuring every bite carries the authentic balance of garlic, onion, and salt that defines Mexican home cooking.
What sets these beans apart is their foolproof technique: soaking overnight for even cooking, frying in small batches for maximum crispiness, and mashing just until smooth—never mushy.
The result is a dish so versatile it pairs perfectly with tortillas, rice, or scrambled eggs, yet feels special enough for weekend brunches. Whether you're serving a family-style meal or meal prepping for the week, this recipe delivers restaurant-quality results at home.
The process may seem labor-intensive at first glance, but breaking it into simple steps—soaking, drying, frying, and seasoning—makes it manageable even for beginners.
The aroma of garlic sizzling in lard alone will fill your kitchen with warmth, while the final texture is creamy yet slightly crispy, with just enough bite to keep it interesting.
Top with fresh cilantro, diced avocado, or a sprinkle of queso fresco for an extra layer of flavor that feels distinctly Mexican.
This isn’t just a side dish—it’s a cultural cornerstone, the kind of recipe passed down through generations. Once you taste the difference between store-bought and homemade, you’ll never go back. Let’s get started on a batch that’ll have everyone asking for seconds.
Ingredients for traditional mexican refried beans
Authentic Mexican flavor begins with these twelve essential ingredients—simple yet transformative.
| Ingredient | Amount | Notes |
|---|---|---|
| Dried Pinto Beans 🌾 | 1 ½ cups | Unsoaked, no need to rinse |
| Vegetable Lard or Vegan Butter 🧈 | ½ cup | Vegetable lard preferred for authenticity |
| Yellow Onions 🧅 | 1 whole | Medium, finely chopped |
| Garlic Cloves 🧄 | 6 cloves | Fresh, minced for depth |
| Salt 🧂 | 1 ½ tsp | Diamond Crystal kosher preferred |
| Dried Mexican Oregano 🌿 | 1 tsp | Authentic flavor profile |
| Ground Cumin 🌶️ | ½ tsp | Freshly toasted for aroma |
| Fresh Cilantro 🌿 | ¼ cup | Chopped, for garnish |
| Avocados 🥑 | 1 whole | Diced, for serving |
| Queso Fresco 🧀 | ½ cup | Crumbled, optional topping |
| Lime 🍋 | 1 whole | Juiced, for brightness |
| Water 💧 | 4 cups | For soaking beans |
The dried pinto beans are the foundation, and Hatch Green Chile Company or La Preferida brands deliver the most consistent texture. Soak them overnight in 4 cups of water—this ensures even cooking and eliminates the need for long simmering. For the lard, vegetable lard from Latin markets replicates the traditional taste, though vegan butter works in a pinch. Fresh garlic and onions are non-negotiable; yellow onions from the produce section provide the right balance of sweetness and sharpness. Toast the cumin seeds in a dry pan for 30 seconds before grinding to unlock their full aroma—this small step elevates the entire dish.
No Mexican oregano? Dried Italian oregano at half the amount works, but the flavor won’t be authentic. Short on lard? Olive oil or coconut oil can substitute, though the texture will be slightly less crispy. The avocados and queso fresco can be swapped for guacamole or cotija cheese if preferred. For extra smokiness, add a quarter teaspoon of smoked paprika to the frying lard. Always use fresh lime juice—bottled versions lack the bright acidity needed to cut through the richness. If serving immediately, keep the cilantro and lime separate until ready to eat to preserve their freshness.
Refried beans keep for 5 days in the fridge when stored in an airtight container with a thin layer of lard on top to maintain moisture. For longer storage, freeze portions in ice cube trays—they thaw perfectly for quick meals. Reheat gently on low heat, adding a splash of water if they dry out. The beans taste even better the next day as flavors meld. Portion into containers for meal prep, and always serve with warm tortillas or rice to highlight their creamy texture. The aroma alone will draw everyone to the table.
Why You'll Love This Recipe
- One-Pot Magic: I swear by this—just beans, onions, and a splash of lard in one pot. No fancy gadgets, no extra bowls, and honestly? The mess stays contained. (My countertops thank me every time.)
- Rich, Caramelized Depth: That slow cook with onions until they’re golden-brown? Pure flavor gold. The lard melts into the beans, creating a texture so creamy it’s almost sinful—like a hug for your taste buds.
- Meal Prep MVP: Make a big batch on Sunday, and you’ve got breakfast, burrito filling, or taco night covered. My freezer is always stocked with these because they reheat like they’re fresh out of the pot.
- Budget-Friendly Staple: Dried pinto beans and onions? Cheaper than takeout, hands down. And because they keep well, I’m always feeding my family without breaking the bank—especially when I stretch them with rice or cheese.
Step-by-step instructions for traditional Mexican refried beans
Here's the authentic method for beans with rich, smoky depth and velvety texture.
Soak and Parboil the Pinto Beans
Place the 1.5 cups dried pinto beans in a large bowl and cover completely with the 4 cups water. Let them soak overnight at room temperature—this ensures even cooking and prevents splitting. The next morning, drain and rinse the beans thoroughly under cold water.
Transfer the soaked beans to a heavy-bottomed pot and add fresh 4 cups water. Bring to a boil over high heat, then immediately reduce to a gentle simmer. Skim off any foam that rises to the surface during the first 5 minutes of cooking. This step removes impurities that would otherwise make the beans bitter. Simmer uncovered for 45-60 minutes until the beans are tender but not mushy—they should hold their shape when pressed between fingers.
Build the Flavor Base with Onions and Garlic
While the beans cook, heat the 0.5 cup vegetable lard or vegan butter in a heavy skillet over medium-low heat. Add the 1 whole yellow onions, finely chopped, and cook for 8-10 minutes until they become soft and translucent without browning. This gentle cooking prevents burning while developing sweetness.
Add the 6 cloves garlic, minced, and the 1.5 teaspoons salt, 1 teaspoon dried Mexican oregano, and 0.5 teaspoon ground cumin. Stir constantly for 1-2 minutes until the garlic becomes fragrant but not browned. The spices should meld with the onions, creating a fragrant paste that forms the foundation of your beans. Remove this mixture from the skillet and set aside—it will be combined with the cooked beans shortly.
Mash the Beans to Perfection
Drain the cooked beans, reserving 1 cup of the cooking liquid. Using a potato masher or wooden spoon, mash the beans directly in the pot until they reach a chunky, rustic texture—this is key for authentic refried beans. You want some texture remaining, not a smooth puree. Add the reserved cooking liquid 1 tablespoon at a time while mashing to achieve a creamy consistency. Too much liquid makes the beans watery; too little results in a dry, gritty texture.
Return the skillet with the onion-garlic mixture to medium heat and add the mashed beans. Stir continuously for 5-7 minutes, breaking up any large lumps and incorporating the flavor base. The beans should develop a smooth, velvety texture with visible specks of onion and garlic. If the mixture becomes too thick, add 1 tablespoon of the reserved cooking liquid at a time until it reaches a spreadable consistency. The final texture should be thick enough to hold its shape when spooned but still smooth.
Finish with Fresh Herbs and Brightness
Remove the skillet from heat and stir in the 0.25 cup chopped fresh cilantro. This adds a bright, herbaceous finish that cuts through the richness of the lard and beans. Taste and adjust the seasoning with additional salt if needed—traditional refried beans should be well-seasoned but not salty. The beans are now ready to serve immediately or be reheated later.
For serving, top each portion with diced avocados and a sprinkle of 0.5 cup crumbled queso fresco. Finish with a squeeze of juice from the whole lime to add a zesty contrast that balances the smoky, creamy flavors. The lime juice also prevents the avocado from browning and enhances the overall brightness of the dish. Serve warm with tortillas, rice, or as a side to grilled meats.
Pro Tips For Making Traditional Mexican Refried Beans
- SOAK BEANS OVERNIGHT: I learned this the hard way—rushing the soak with cold water leaves skins tough and beans gummy. Use 4 cups water per 1 cup dried pintos, add 1 tsp baking soda (yes, even if you’re skeptical), and let them sit 12+ hours. The longer they soak, the creamier your final mash will be.
- CRUSH BEANS IN BATCHES: Don’t dump all the cooked beans into the pot at once—you’ll end up with uneven texture. Work in 2-3 portions, mashing each batch with a wooden spoon or potato masher until smooth. This ensures every bite has that classic, velvety consistency without grittiness.
- COOK LOW AND SLOW: After adding the lard or vegan butter, resist the urge to crank the heat. Simmer the beans on medium-low for 20-30 minutes, stirring often. High heat burns the onions and garlic, turning them bitter—this is the thing that matters most for authentic flavor.
- SALT THE WATER: Add 1 tsp salt to the soaking water (and another ½ tsp when cooking). Skipping this step means your beans will taste bland no matter how much seasoning you add later. The salt breaks down the skins better, too—trust the process.
Common mistakes when making perfect results
Over-Soaking the Beans
I’ve seen beginners soak beans for 24+ hours thinking it’ll speed up cooking, but this actually leaches too much starch, making them mushy when mashed. The ideal soak time is 8-12 hours—just enough to soften them without breaking down their structure.
After soaking, always rinse them thoroughly to remove excess starch that can make your beans gluey. 🌱
Skipping the Parboil Step
Many recipes omit the initial boil after soaking, but this critical step removes impurities that cause bitterness. Always bring your beans to a full boil for 5 minutes and skim off foam before simmering.
I’ve tasted beans missing this step—trust me, the difference is noticeable. The foam contains natural compounds that make beans taste flat and slightly off.
Using Too Much Liquid
The biggest texture mistake? Adding too much water when mashing. Refried beans should be creamy but not soupy. Start with just 1 cup of cooking liquid and add 1 tablespoon at a time until you reach the perfect consistency.
I’ve had batches turn into bean soup because someone added a full cup of water—don’t make that mistake!
Burning the Onion-Garlic Base
Cooking onions and garlic at high heat causes them to burn, creating bitter flavors that ruin the dish. Always use medium-low heat and stir constantly. If your onions start to brown too quickly, reduce the heat immediately. The base should be soft, translucent, and fragrant—not crispy or dark. 🔥
Over-Mashing the Beans
Authentic refried beans have texture—they shouldn’t be smooth like refried beans from a can. Use a potato masher or wooden spoon to break them down just until chunky. Over-mashing creates a gluey, pasty consistency that lacks the rustic appeal of homemade beans. Think "rustic mashed potatoes," not "pudding."
Ignoring the Resting Period
After cooking, let your beans rest for 10-15 minutes before serving. This allows flavors to meld and prevents a gummy texture. I’ve served beans immediately, and they always taste slightly flat compared to rested beans.
The resting time also helps the beans absorb any extra seasoning you might want to add at the end.
Nutrition facts
Frequently asked questions
Can I use canned beans instead of dried for this recipe?
While it’s possible, canned beans won’t give you the same authentic texture or depth of flavor. Dried beans develop a richer, creamier consistency when fried in lard. If you must use canned, opt for low-sodium pinto beans and drain them well, then simmer for 10 minutes to thicken before mashing. You’ll still need to fry them in lard to achieve that signature velvety finish.
What’s the best way to store leftover refried beans?
Store them in an airtight container with a thin layer of lard or oil on top to preserve moisture. They’ll keep in the fridge for 5 days or up to 3 months in the freezer. For freezing, portion into ice cube trays for easy thawing—just pop one out and reheat with a splash of water. The flavor actually improves after resting overnight!
How do I make this recipe vegan?
Replace the vegetable lard with vegan butter or coconut oil, and use vegetable broth instead of water for cooking the beans. The texture will be slightly less crispy but still delicious. For extra richness, stir in 1 tablespoon nutritional yeast at the end—it adds a cheesy, umami depth that complements the smoky flavors.
Why do my beans turn out watery?
Watery beans usually mean you added too much liquid when mashing. Start with just 1 cup of cooking liquid and add 1 tablespoon at a time until you reach a thick, spreadable consistency. Over-mashing also releases more starch, making them gluey. For a quick fix, simmer the beans uncovered for 5-10 minutes to evaporate excess moisture.
Can I make these beans in a slow cooker?
Yes, but you’ll need to adjust the method. Soak the beans overnight, then transfer them to the slow cooker with 6 cups water and cook on low for 6-8 hours until tender. Drain, mash, and fry in a skillet as directed—this step is essential for the creamy texture. The slow cooker saves time but doesn’t replace the frying process for authenticity.